Offroad Trailblazers and Envoys

firefox2501's Build - 2006 Chevy Trailblazer LT

These are lifted trucks and have posted trip reports showing travel on non-stock passable trails.

Moderator: navigator

by firefox2501 » Sat Mar 09, 2013 9:15 pm

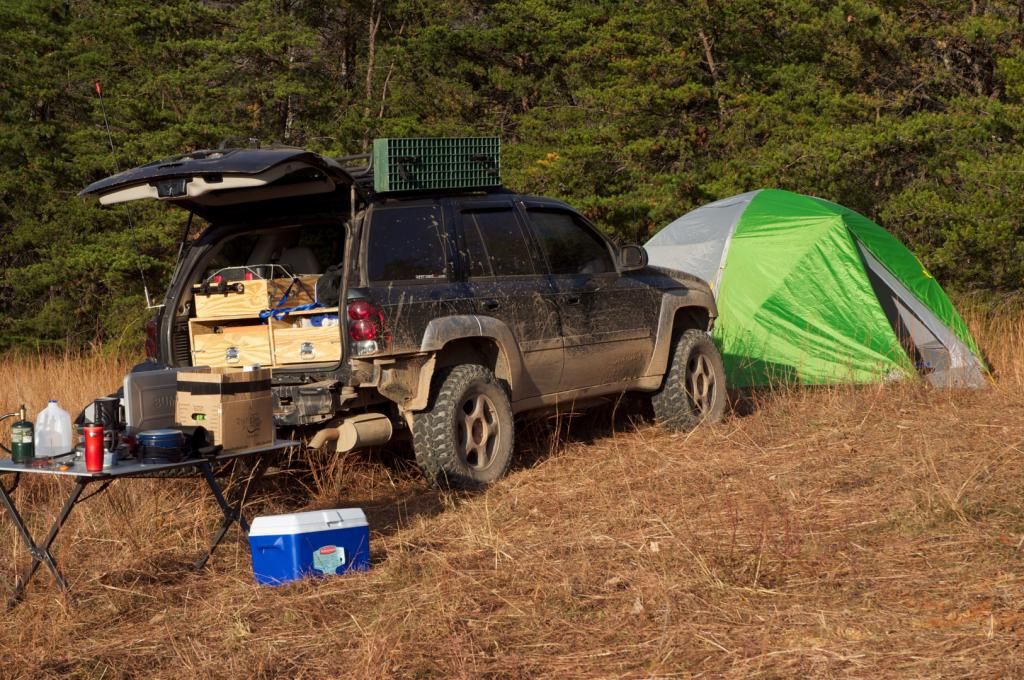
2006 Chevy Trailblazer LT

Image
Photo taken Nov 9, 2014 during TECORE XI

Drivetrain Specs:
4.2L I6 - GU6 (3.42), without G80

Suspension Modifications:
255/75R-17 (32") - Firestone Destination M/T
1.5" wheel spacers from Liftmeister
Power Stop Zinc Coated Drilled & Slotted Rotors

Front:
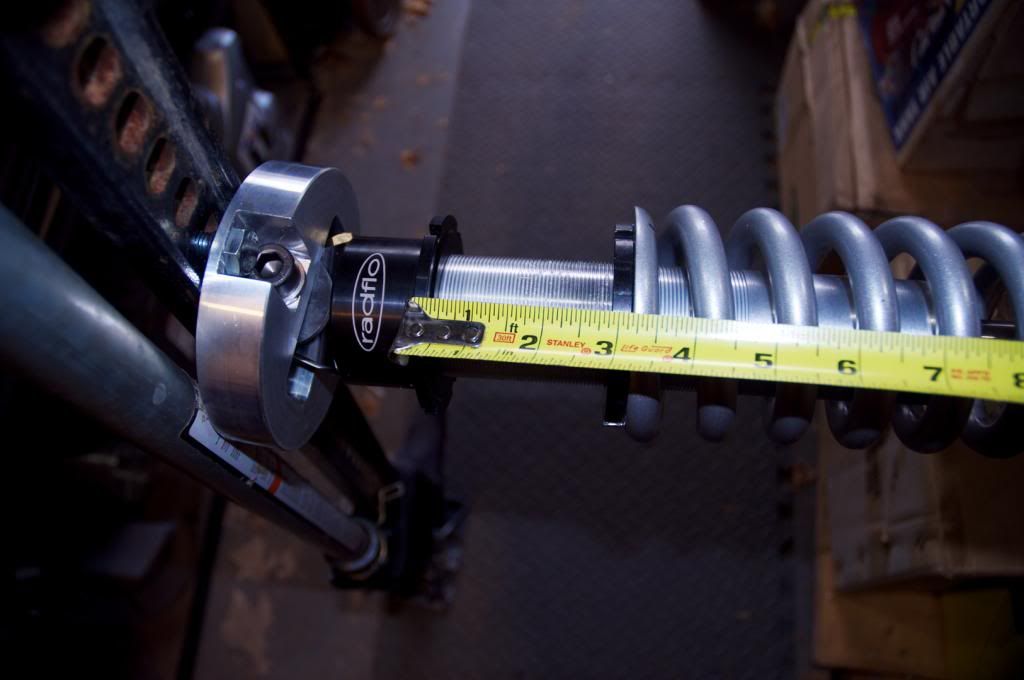
Radflo coil overs adjusted to 3.25" (see this thread: viewtopic.php?f=15&t=4833)
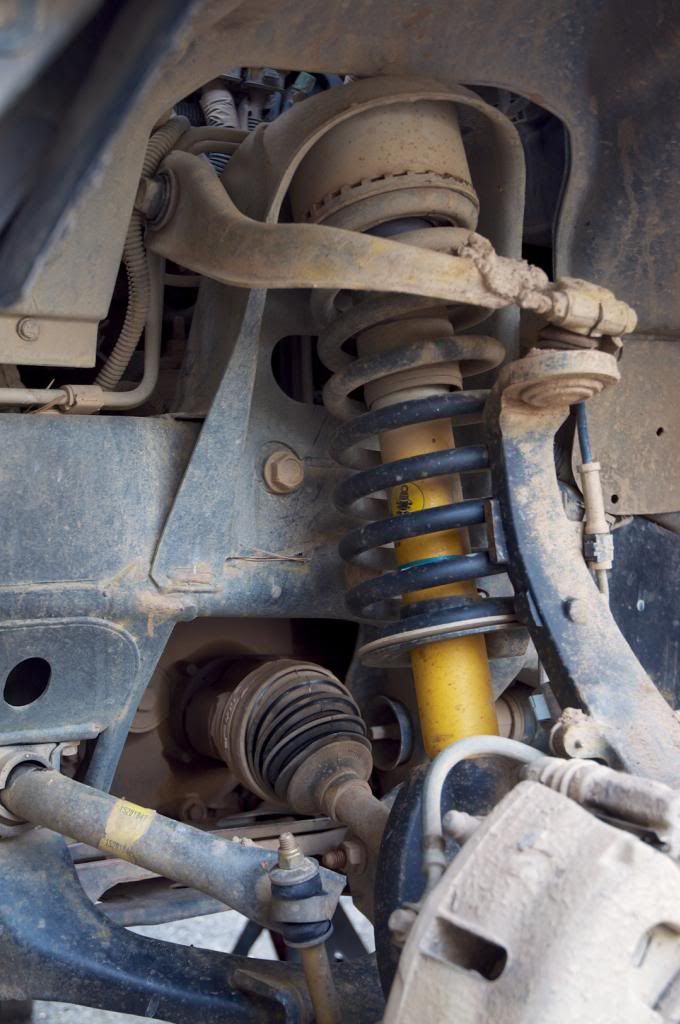
Flipped UCAs
EXT/SS Brake Upgrade - viewtopic.php?f=27&t=4622
Sway Bar disconnected

Back:
2" Liftmeister Lift
Bilstein 5100 (part number: 33-185552)
Z71 Springs
Panhard lowering bracket from ErikSS
Sway Bar removed

Exterior Modifications:
Running boards removed
Front bumper cover removed
Front fender liners trimmed (yes...I still have the fender liners...)
Stock front bumper trimmed, shaped and flipped upside down to mount the OEM tow hooks
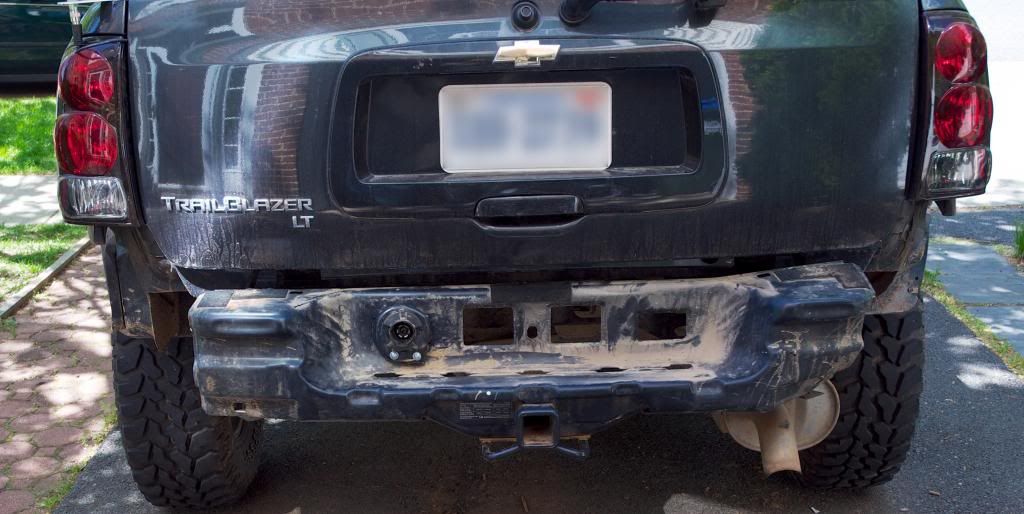
Rear bumper cover removed
Trailer connector receptacle relocated
Stock rims painted black with Plasti Dip
2x PIAA 520 ATP lights mounted on the stock bumper
Custom Roof Light Bar
4x PIAA 510 ATP lights mounted on custom roof light bar
Yakima Megawarrior gear basket
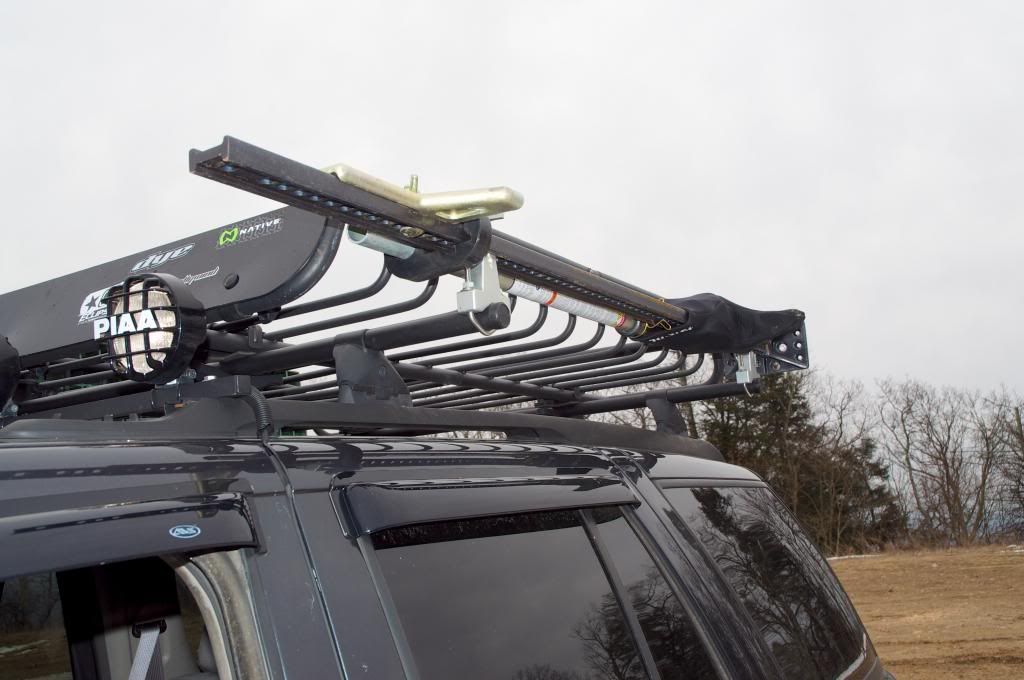
Hi-Lift mounts on Yakima cross bars beside the gear basket
MDB Radiator Skid
MDB Oil Pan Skid
Purple Cranium Rear Differential Guard
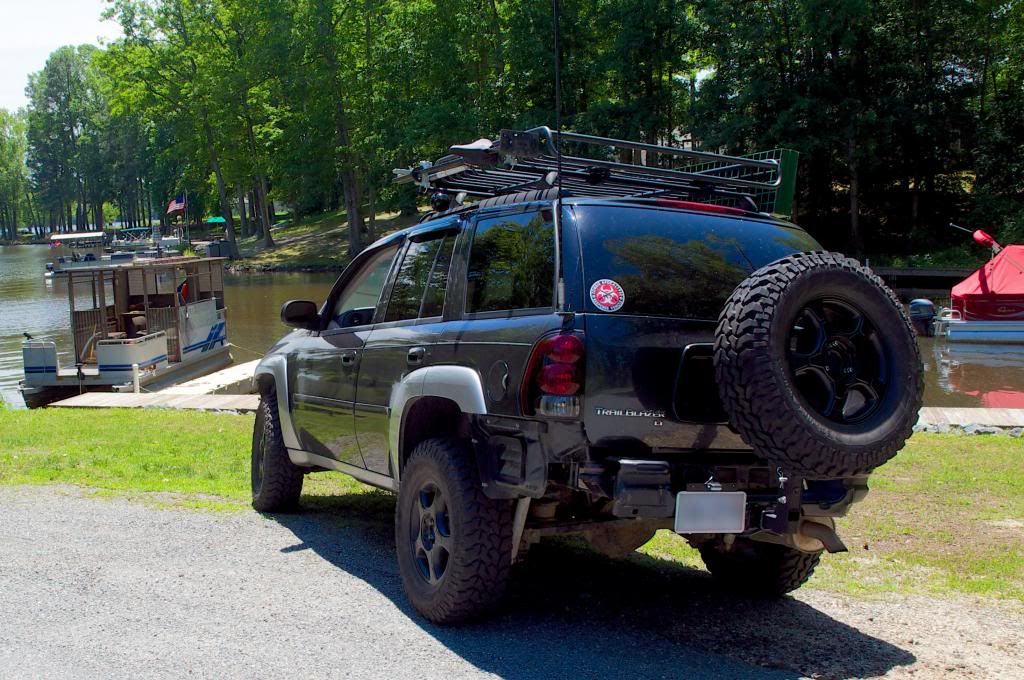
CBI Offroad Fabrication tire carrier
Rear license plate relocated

Engine Modifications:
none

Interior Modifications:
Husky Liner Floor Mats
Cargo drawers

Recovery Equipment:
Hi-Lift, Lift Mate, Off-Road Base, Off-Road kit
Hi-Lift Handle-All
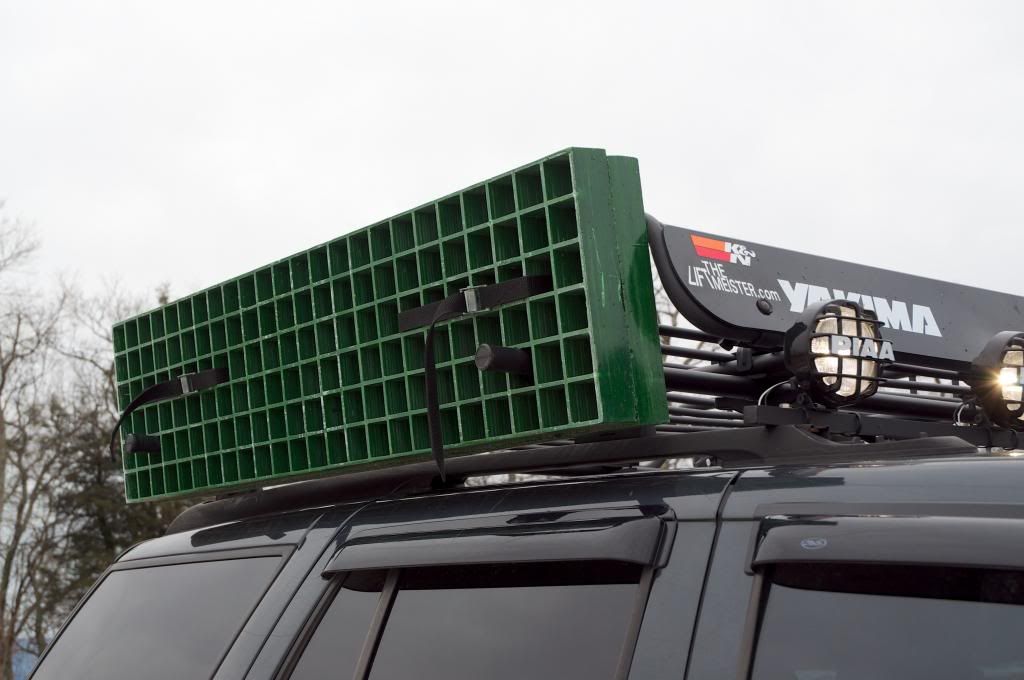
OKoffroad XD waffle boards/bridging ladders
Tow Straps
2ea Grade 70 5/16", 20 foot long tow chains (mainly for the H-Lift winching capability)
ARB Recovery Kit (snatch strap, tree saver, snatch block, winch extension strap)
Numerous d-shackles
Receiver mount d-shackle
Q Industries MV50 SuperFlow Air Compressor
50 foot air hose
Staun Tire Deflators
ARB Speedy Seal Tire Repair Kit
Craftsman electronic tire pressure gauge
285 piece mechanics tool box (1/4, 3/8, 1/2 sockets, wrenches, hex key wrenches, torx bits, standard/phillips screwdriver bits)
Jumper Cables
Flashlight
Numerous cargo straps
Variety of gloves (1 pair water proof gloves, 1 pair welding gloves, 2 pair cold weather gloves, several pairs of standard leather work gloves)

Electrical Modifications:
Custom wiring harnesses for the lights
Uniden PRO520XL CB
Firestick 4' CB antenna

Pending install:
Winch (Quadratec Q11000, steel cable. Not my first choice, but this one was given to me for free! Now I just need a bumper to mount it to.)

Coming soon:
Front bumper
Rear bumper
Rock sliders
Last edited by firefox2501 on Wed Sep 14, 2016 8:01 pm, edited 27 times in total.
User avatar
firefox2501
Off-Roader
 
Posts: 208
Joined: Sat Mar 09, 2013 7:49 pm
Location: VA, Chantilly
Name: Mike
Vehicle Year: 2006
Vehicle: Chevrolet TrailBlazer
DriveTrain: 4WD
Rank: Offroad Rated

by firefox2501 » Tue Mar 26, 2013 10:13 pm

(picture taken 17 Jun 2012)

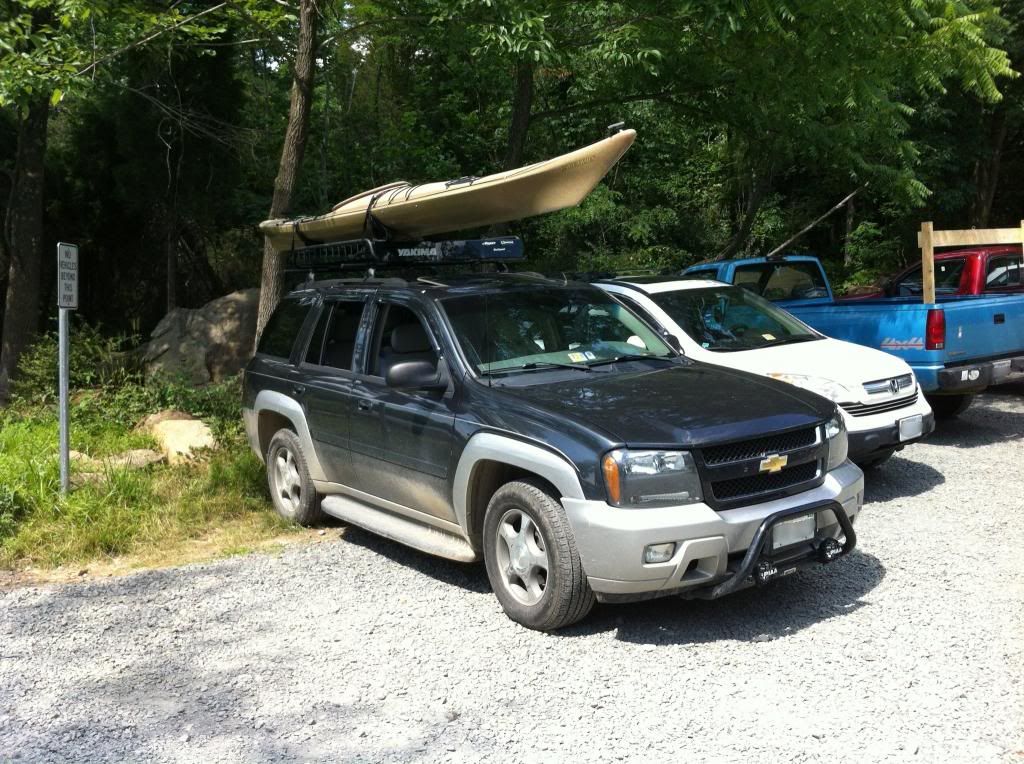
This is the oldest picture I have of my TB:
Image

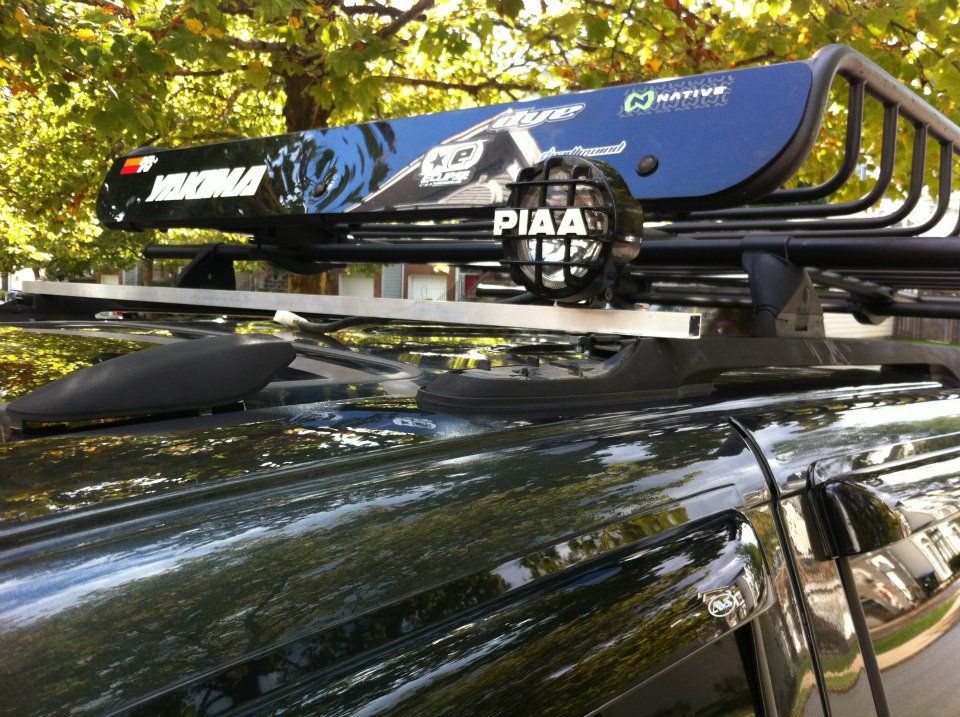
The Yakima roof rack was the first thing added so that I could carry my beloved kayak. The Westin light bar was originally purchased to have an easy tie down point for the bow of the 'yak.

The vehicle is otherwise stock.

edit: added date and moved picture to photo hosting site
Last edited by firefox2501 on Sun May 05, 2013 5:10 pm, edited 1 time in total.
User avatar
firefox2501
Off-Roader
 
Posts: 208
Joined: Sat Mar 09, 2013 7:49 pm
Location: VA, Chantilly
Name: Mike
Vehicle Year: 2006
Vehicle: Chevrolet TrailBlazer
DriveTrain: 4WD
Rank: Offroad Rated

by firefox2501 » Tue Mar 26, 2013 10:24 pm

(pictures taken 4 Jul 2012)

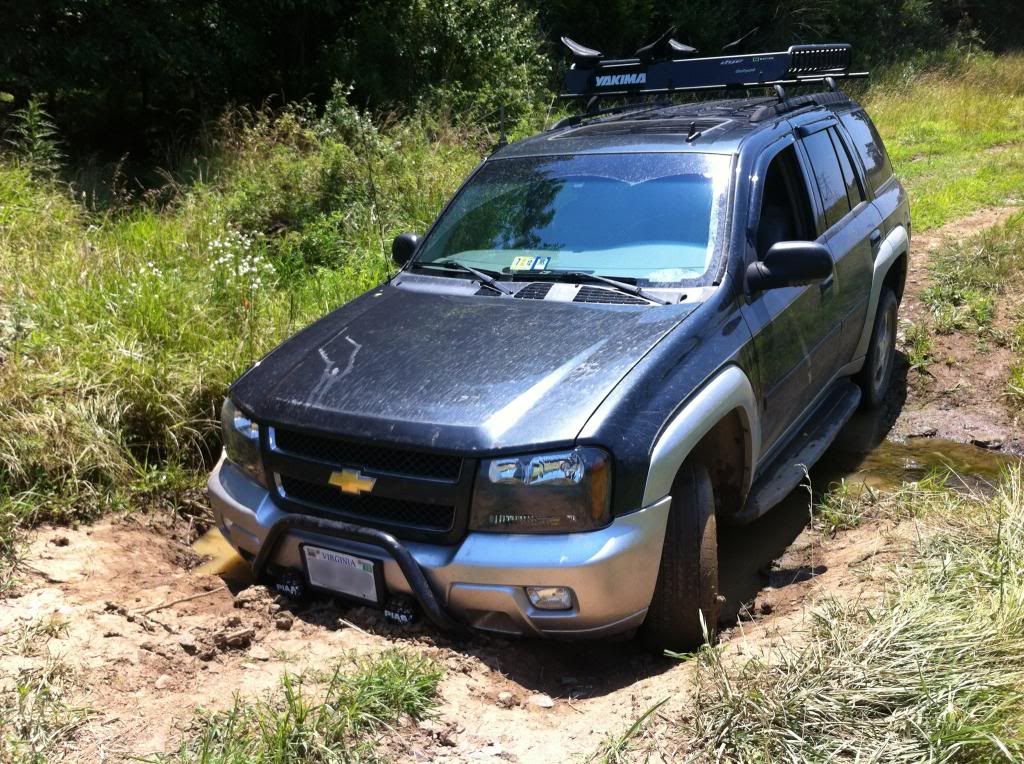
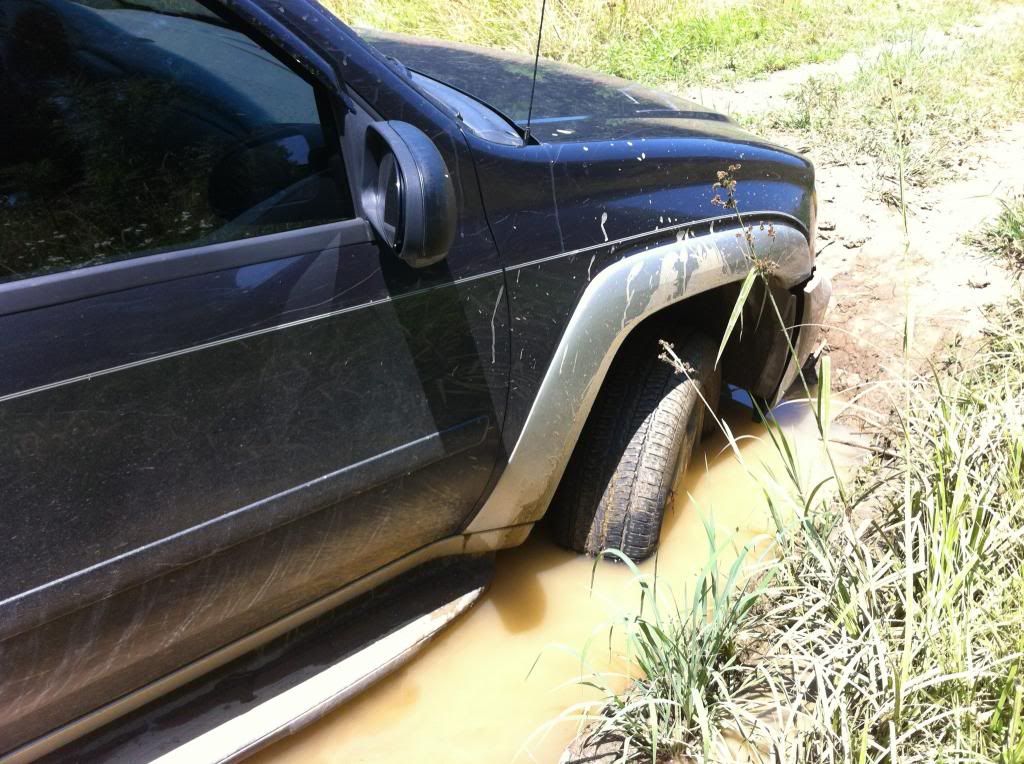
But one scouting trip while looking for new places to drop the kayak in the water was the final straw...

Image

The front end weight was primarily on the Westin light bar.
The rear end weight was primarily on the spare tire.
No traction meant not going anywhere - this sucked!

Image
And the OE tires are horrible!


I NEEDED A CHANGE!

Thankfully, a friend of mine was in the area to help me out.

And it is time to look at tires, a lift, and most importantly - recovery gear!

edit: added date and moved pictures to photo hosting site
Last edited by firefox2501 on Sun May 05, 2013 5:14 pm, edited 1 time in total.
User avatar
firefox2501
Off-Roader
 
Posts: 208
Joined: Sat Mar 09, 2013 7:49 pm
Location: VA, Chantilly
Name: Mike
Vehicle Year: 2006
Vehicle: Chevrolet TrailBlazer
DriveTrain: 4WD
Rank: Offroad Rated

by firefox2501 » Tue Mar 26, 2013 10:37 pm

(work completed 4 Oct 2012)

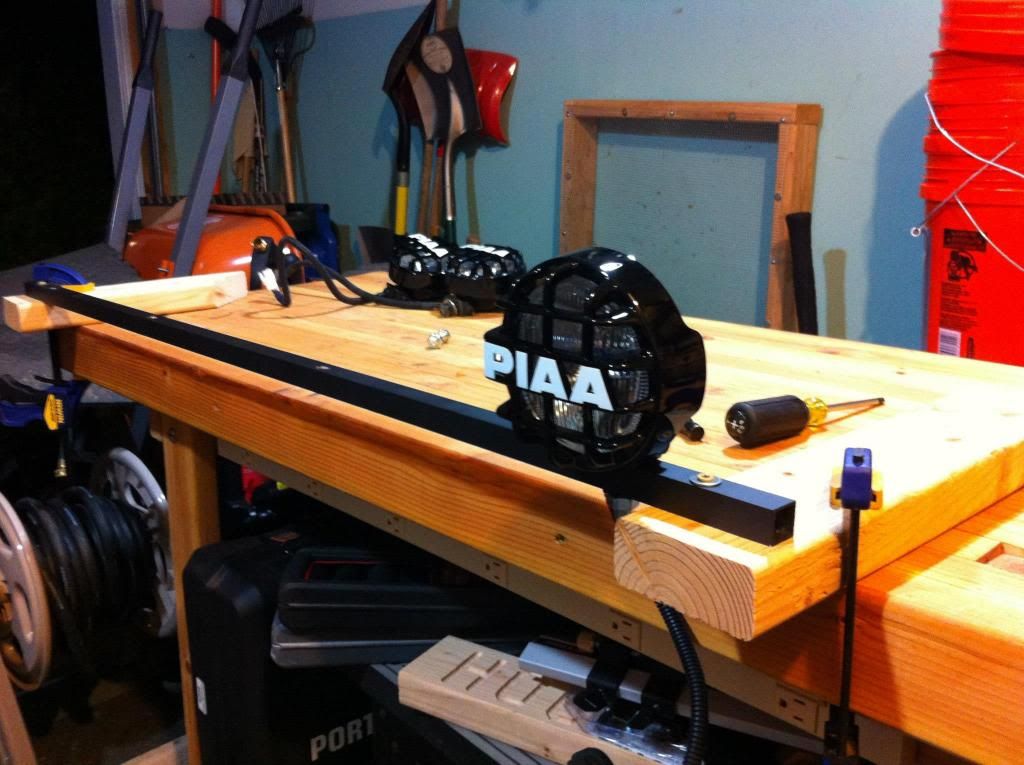
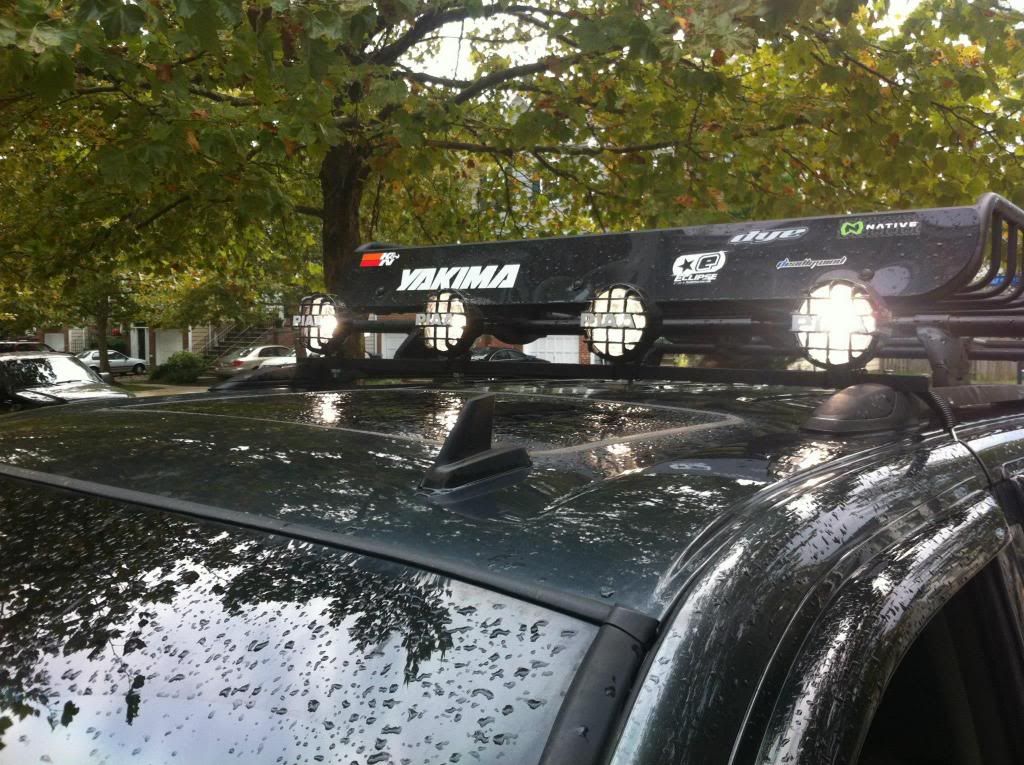
But I wanted to take my time and get all of the parts before I lifted it. So while waiting for the parts to come in, I figured it was time for a weekend project.

I was inspired by James Downing's custom roof light bar so I decided to build my own - with minor modifications, of course.

fit testing:
Image

temporarily mounted to my workbench for light mounting and wiring:
Image

mounted, wired, and ready to be aimed:
Image

Fun little project that has proved very handy!

edit: added date and moved pictures to photo hosting site
Last edited by firefox2501 on Sun May 05, 2013 5:24 pm, edited 1 time in total.
User avatar
firefox2501
Off-Roader
 
Posts: 208
Joined: Sat Mar 09, 2013 7:49 pm
Location: VA, Chantilly
Name: Mike
Vehicle Year: 2006
Vehicle: Chevrolet TrailBlazer
DriveTrain: 4WD
Rank: Offroad Rated

by firefox2501 » Tue Mar 26, 2013 10:47 pm

(work completed 20 Nov 2012)

And alas - all of the parts for the lift have arrived!

Tires? Check - all 5 of them, full size spare was a requirement for me!
Additional OEM rim for spare? Check - lets me include the spare in the rotation cycle
Liftmeister lift? Check
Bilstien Front Shocks? Check
Bilstien Rear Shocks? Check (I goofed on this one - bought stock length shocks. Definitely a no-go. Later replaced by Skyjacker Nitro 8000 Shocks.)

But since this is my daily driver, I don't have a spring compressor, don't know how to mount/balance tires or how to do an alignment, I took my rig to my mechanic. A day later, the lift was installed.

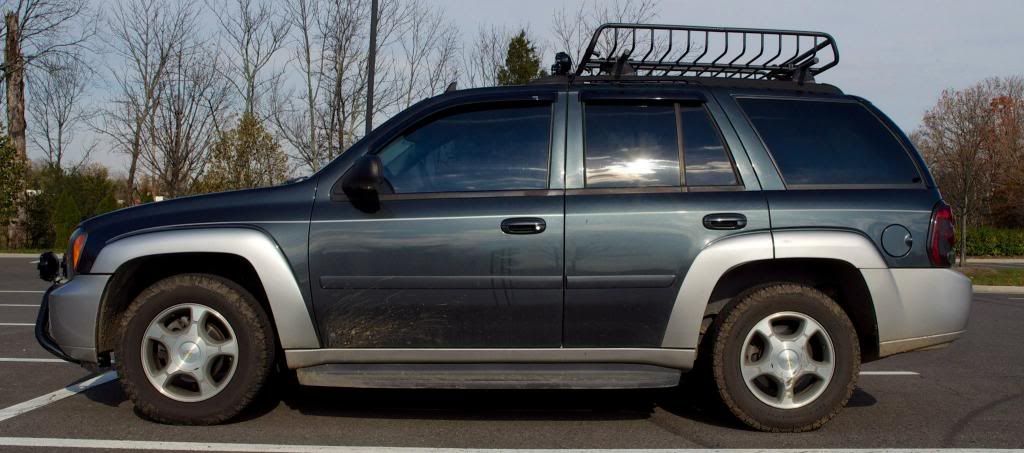
Before:
Image

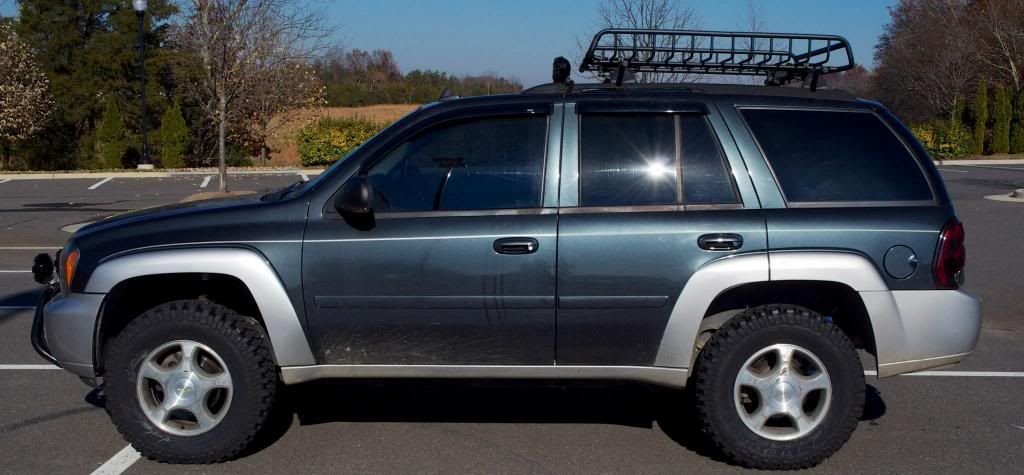
After:
Image

Notice that between the before and after shots, I also removed the running boards.

edit: added date and moved picture to photo hosting site
Last edited by firefox2501 on Sun May 05, 2013 5:27 pm, edited 1 time in total.
User avatar
firefox2501
Off-Roader
 
Posts: 208
Joined: Sat Mar 09, 2013 7:49 pm
Location: VA, Chantilly
Name: Mike
Vehicle Year: 2006
Vehicle: Chevrolet TrailBlazer
DriveTrain: 4WD
Rank: Offroad Rated

by firefox2501 » Tue Mar 26, 2013 11:03 pm

(photos taken 24 Mar 2013)

Remember that recovery equipment that I mentioned?

Well guess what - some of it is pretty darn bulky. And I was tired of having my cargo area used up by it. But recovery gear that is in the garage at home is useless. Time to start strapping stuff to the outside of the truck!

For the Hi-Lift, I picked up the 1"-2" tube mounts and mounted them directly to the Yakima cross bars. Very solid mount, out of the way, but still on hand when I need it. And since it is outside, I picked up the neoprene jack cover to greatly increase the protection of the moving parts.
Image

For the bridging ladders, I went with the OKoffroad XD waffle boards. Light weight, no maintenance, supports 7700lbs? Yeah, that works! And the spacing of the waffles matched up quite nicely with the spacing of the Yakima cross bars. All of the weight is on the cross bars - the cargo straps just hold the waffle boards nice and tight against the gear basket. They do not slide around at all, it is out of the way, and still easy to get to.
Image

But the most important thing (for me) when mounting things was that the gear basket had to remain open and available for my kayak and any other gear that I need to throw up there.

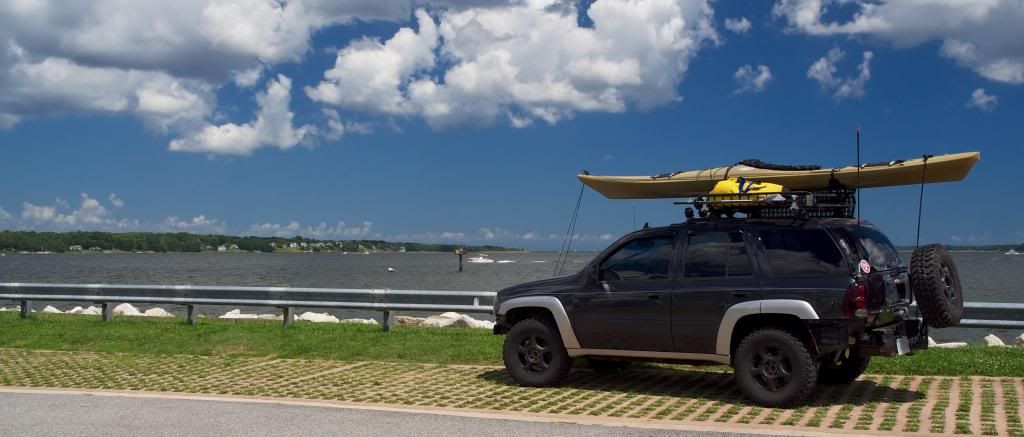
Once the weather warms up again, I will grab another picture with the recovery gear mounted, the kayak on the roof, and the kayak gear bag (life jacket, gloves, spray skirt, self-rescue gear) in the gear basket.

Edit (Nov 09, 2014) kayak photo added:
Image
Photo taken Jul 6, 2013 at the mouth of the Patuxent River, Solomons, MD
Last edited by firefox2501 on Sun Nov 09, 2014 10:27 pm, edited 4 times in total.
User avatar
firefox2501
Off-Roader
 
Posts: 208
Joined: Sat Mar 09, 2013 7:49 pm
Location: VA, Chantilly
Name: Mike
Vehicle Year: 2006
Vehicle: Chevrolet TrailBlazer
DriveTrain: 4WD
Rank: Offroad Rated

by firefox2501 » Sat Mar 30, 2013 3:23 pm

(work completed 30 Mar 2013)

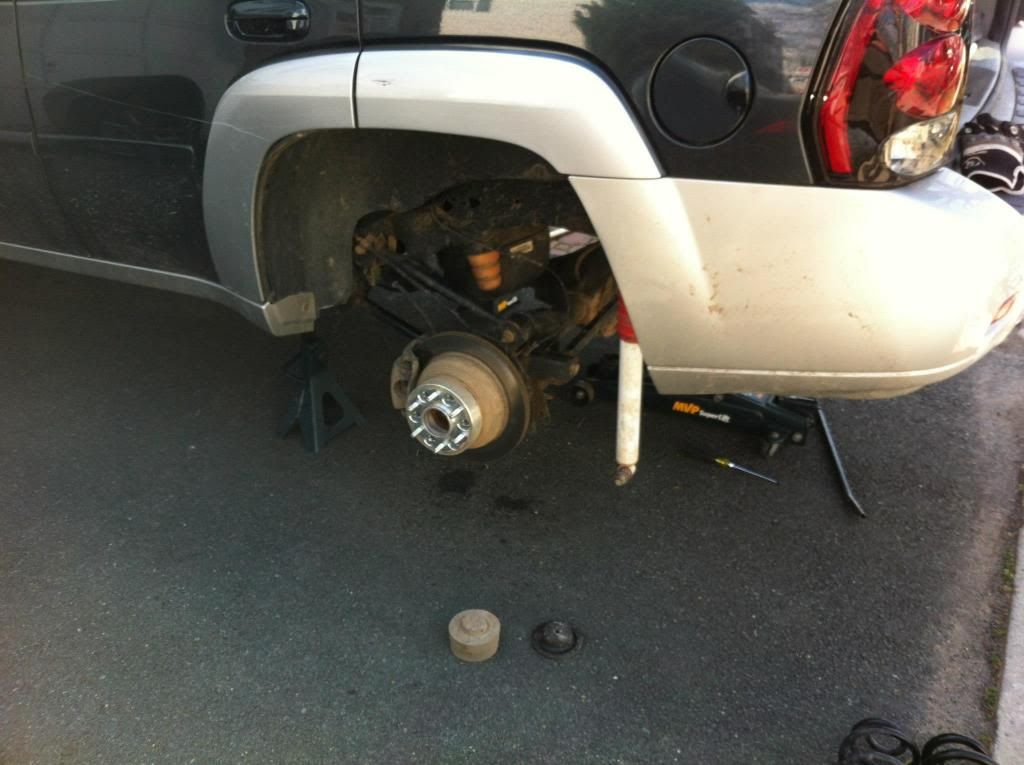
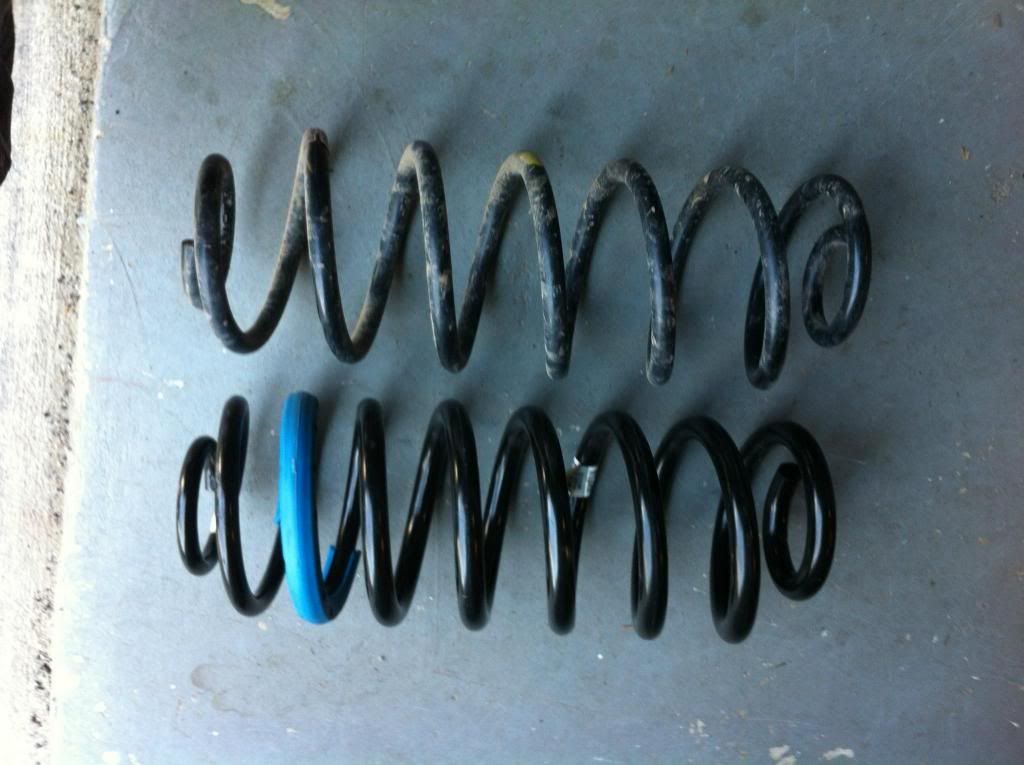
Got some free time on a beautiful day, so I installed some Z71 rear springs and removed the rear sway bar.

Image

I am sure there are other comparison pictures out there, but just in case, here is the difference between the stock springs and the Z71 springs (Z71s on the bottom).

Image

edit: added date and moved picture to photo hosting site
Last edited by firefox2501 on Sun May 05, 2013 5:34 pm, edited 1 time in total.
User avatar
firefox2501
Off-Roader
 
Posts: 208
Joined: Sat Mar 09, 2013 7:49 pm
Location: VA, Chantilly
Name: Mike
Vehicle Year: 2006
Vehicle: Chevrolet TrailBlazer
DriveTrain: 4WD
Rank: Offroad Rated

by firefox2501 » Tue Apr 09, 2013 9:34 pm

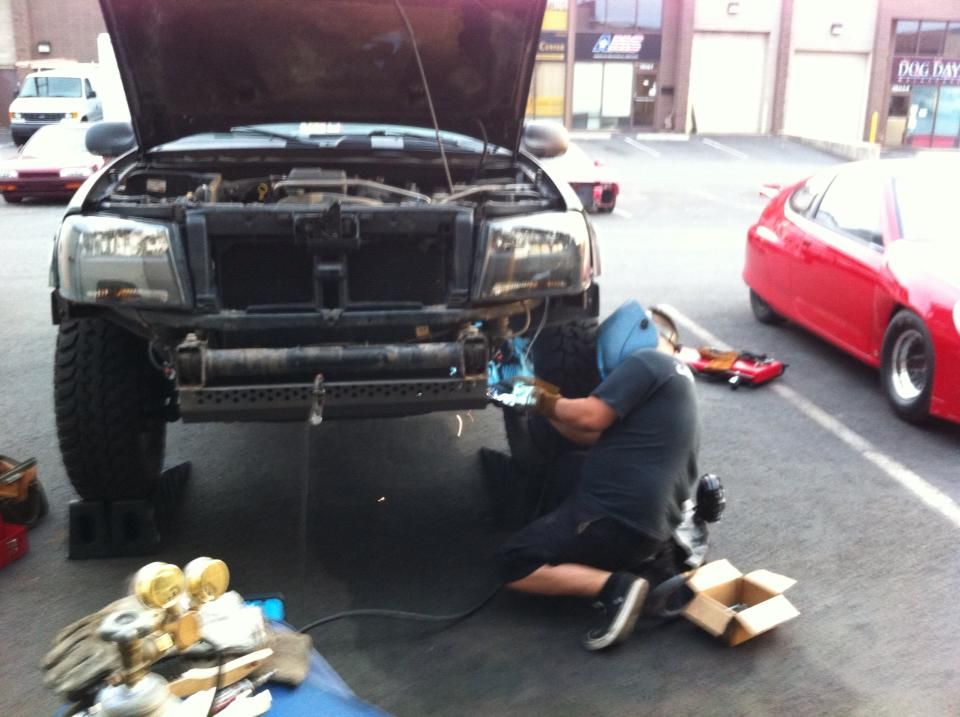
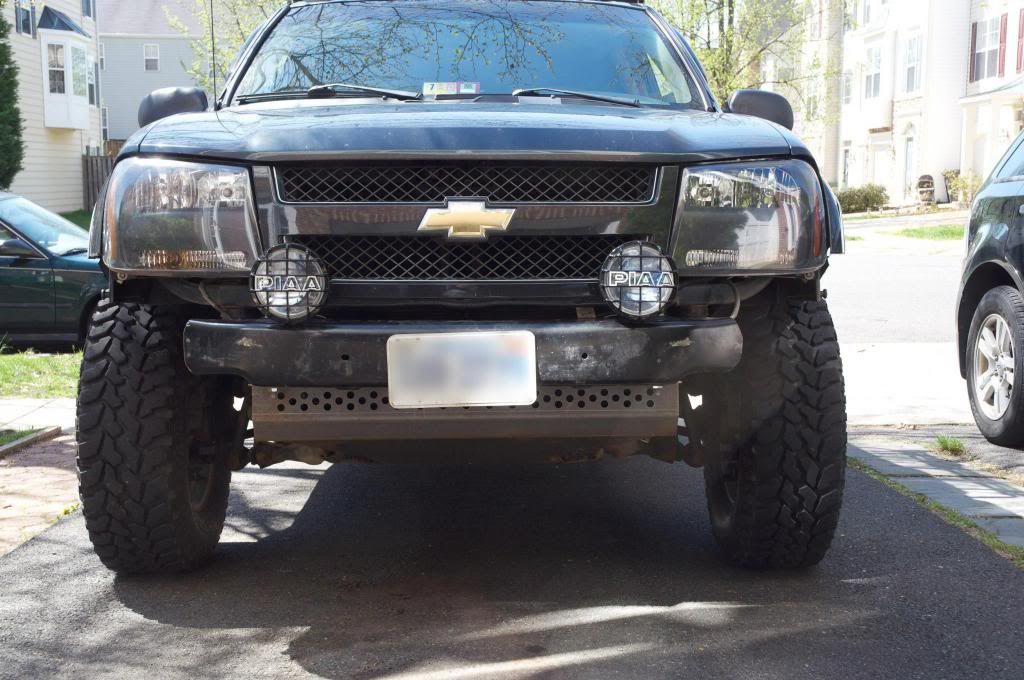
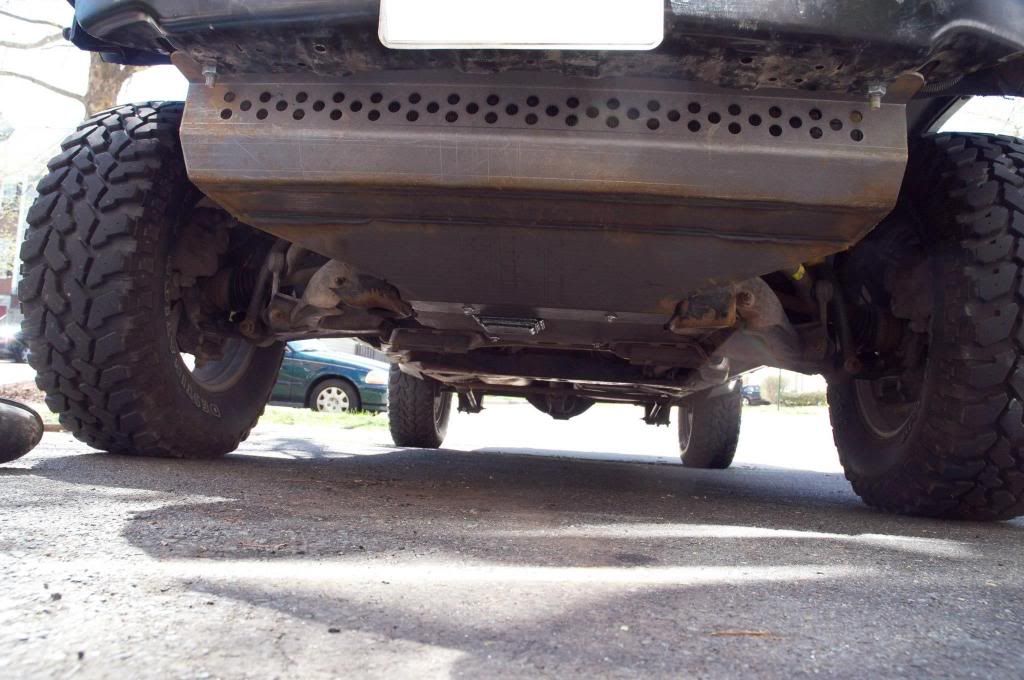
(work completed 13 Apr 2013)

MDB Skid plates installed
Front bumper cover removed
Front fender liners trimmed
Westin Safari Light bar removed (it used the same mount holes as the Radiator Skid)
PIAA 520s relocated to the stock bumper
Stock bumper trimmed and reshaped

Welding by a local fabricator
Image

Image
Image

edit: added date and moved pictures to photo hosting site
Last edited by firefox2501 on Sun May 05, 2013 5:39 pm, edited 2 times in total.
User avatar
firefox2501
Off-Roader
 
Posts: 208
Joined: Sat Mar 09, 2013 7:49 pm
Location: VA, Chantilly
Name: Mike
Vehicle Year: 2006
Vehicle: Chevrolet TrailBlazer
DriveTrain: 4WD
Rank: Offroad Rated

by firefox2501 » Sat Apr 27, 2013 9:10 pm

(work done 28 Apr 2013)

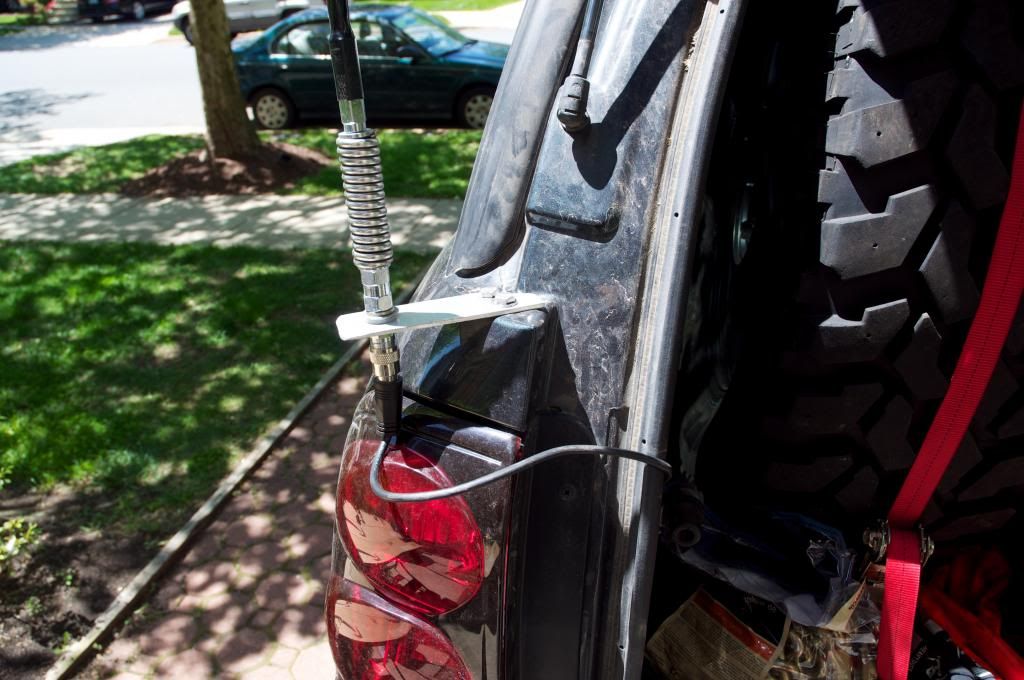
Installed my CB. The antenna mounting bracket redone and installed. CB is mounted to the kick panel just above my left leg. Antenna is mounted as shown:

Image

That is a 1/8 inch thick, 1 1/2 inch wide aluminum bar bolted to the body with 2 1/4 inch bolts. There is a 7/8 inch hole cut in the body just above the rear light to access the locking nuts.

I don't like the PL-259 plug because it takes up too much space and rubs against the tail light. I will be replacing this with a ring terminal and will reroute the cable a little later.
Last edited by firefox2501 on Sun May 05, 2013 5:05 pm, edited 1 time in total.
User avatar
firefox2501
Off-Roader
 
Posts: 208
Joined: Sat Mar 09, 2013 7:49 pm
Location: VA, Chantilly
Name: Mike
Vehicle Year: 2006
Vehicle: Chevrolet TrailBlazer
DriveTrain: 4WD
Rank: Offroad Rated

by firefox2501 » Sun May 05, 2013 4:40 pm

(work done 5 May 2013)

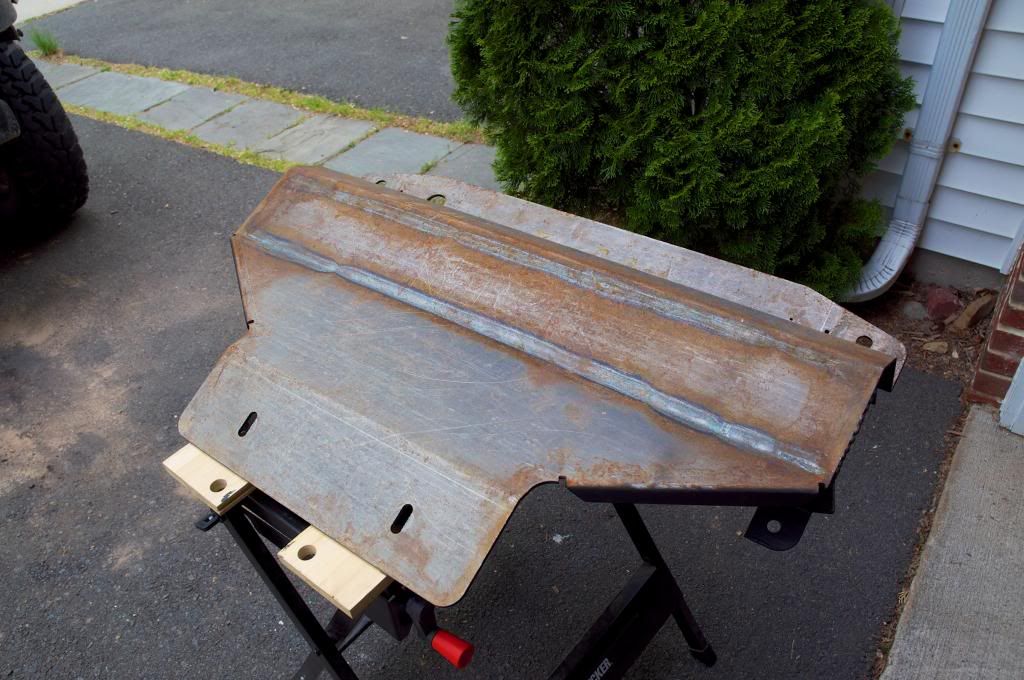
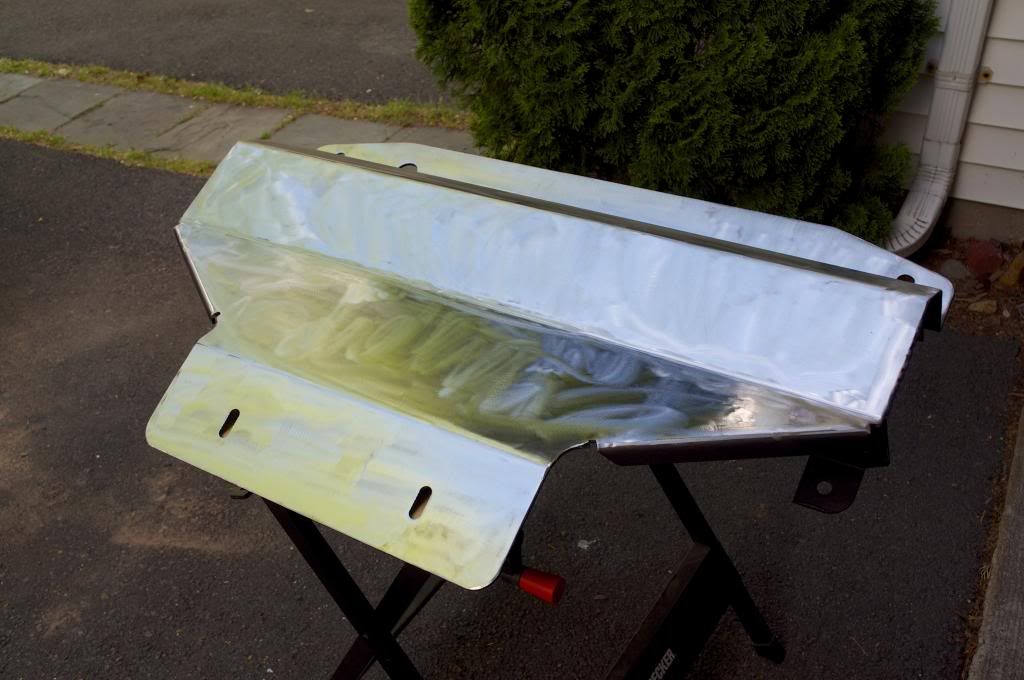
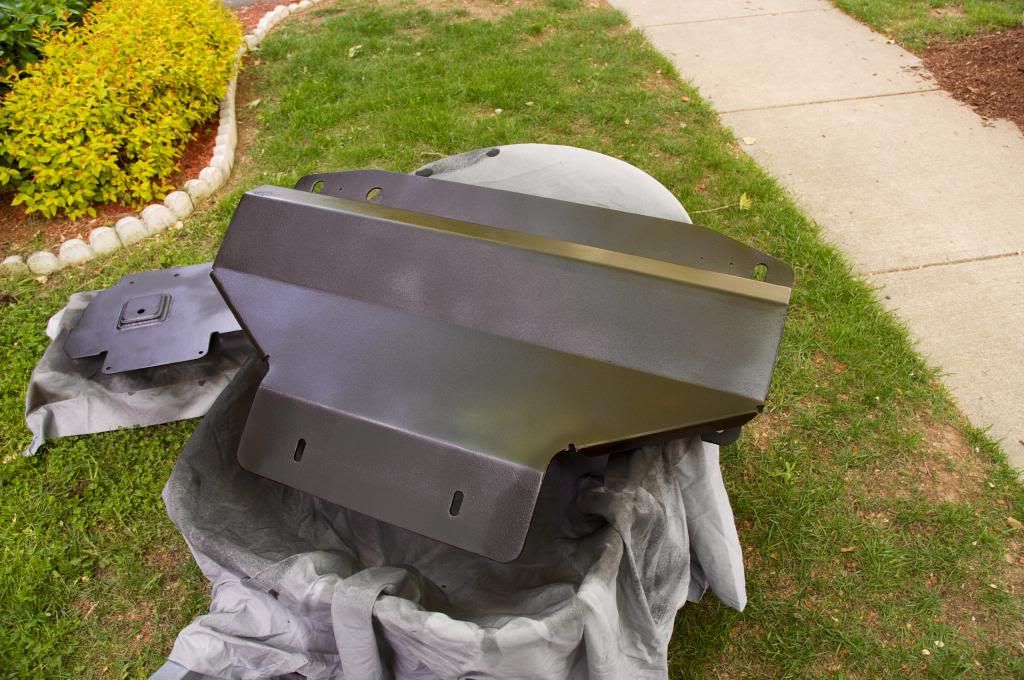
I was growing increasingly concerned with the surface rust on my skid plates. So I removed them, polished the rust off with a flapper disc and painted them with automotive undercoat paint that I got from the local hardware store. I just hope it holds up.

Image

Image

Image

Once the paint dries, I will remount them and update this post.
Last edited by firefox2501 on Sun May 05, 2013 5:05 pm, edited 1 time in total.
User avatar
firefox2501
Off-Roader
 
Posts: 208
Joined: Sat Mar 09, 2013 7:49 pm
Location: VA, Chantilly
Name: Mike
Vehicle Year: 2006
Vehicle: Chevrolet TrailBlazer
DriveTrain: 4WD
Rank: Offroad Rated

by firefox2501 » Sun May 05, 2013 4:48 pm

(work done 5 May 2013)

While waiting for the paint to dry (previous post), I removed my rear bumper cover and relocated my trailer connector receptacle. My bumper cover was damaged last weekend on a ride when I accidentally backed into something. When I removed it to try to fix it, I liked the way the truck looked without it. So off it is!

I relocated the trailer connector receptacle because it was already bent back from hitting something, and aside from the resonator, it was the lowest hanging item. I used an angle grinder with cutoff disk to cut the OEM bracket off, shaped it a bit with a grinding wheel, then bolted it to the bumper with a pair of 1/4 inch bolts. It is not exactly pretty, but it will work until I can work with a fabricator for a new rear bumper.

I knew that resonator hung down pretty low, I just didn't realize HOW low until the bumper cover was removed! I may have to bump up rerouting my exhaust higher on my list of things to do!

Image
User avatar
firefox2501
Off-Roader
 
Posts: 208
Joined: Sat Mar 09, 2013 7:49 pm
Location: VA, Chantilly
Name: Mike
Vehicle Year: 2006
Vehicle: Chevrolet TrailBlazer
DriveTrain: 4WD
Rank: Offroad Rated

by firefox2501 » Mon May 27, 2013 10:25 pm

(picture taken 25 May 2013)

Got my rear tire carrier from CBI Offroad Fabrication and relocated my rear license plate to keep it legal...

Image
User avatar
firefox2501
Off-Roader
 
Posts: 208
Joined: Sat Mar 09, 2013 7:49 pm
Location: VA, Chantilly
Name: Mike
Vehicle Year: 2006
Vehicle: Chevrolet TrailBlazer
DriveTrain: 4WD
Rank: Offroad Rated

by firefox2501 » Sat Nov 16, 2013 6:00 pm

(work done 16 Nov 2013)

Finally got tired of the back of my truck being cluttered, so I built a custom set of drawers to better organize things.

UPDATE: The mounting screws for the drawer slides did not survive a trip on Dictum Ridge. So this has been removed from my vehicle and will be redesigned...
Last edited by firefox2501 on Sun Jun 29, 2014 12:30 pm, edited 1 time in total.
User avatar
firefox2501
Off-Roader
 
Posts: 208
Joined: Sat Mar 09, 2013 7:49 pm
Location: VA, Chantilly
Name: Mike
Vehicle Year: 2006
Vehicle: Chevrolet TrailBlazer
DriveTrain: 4WD
Rank: Offroad Rated

by firefox2501 » Sat Dec 21, 2013 3:16 pm

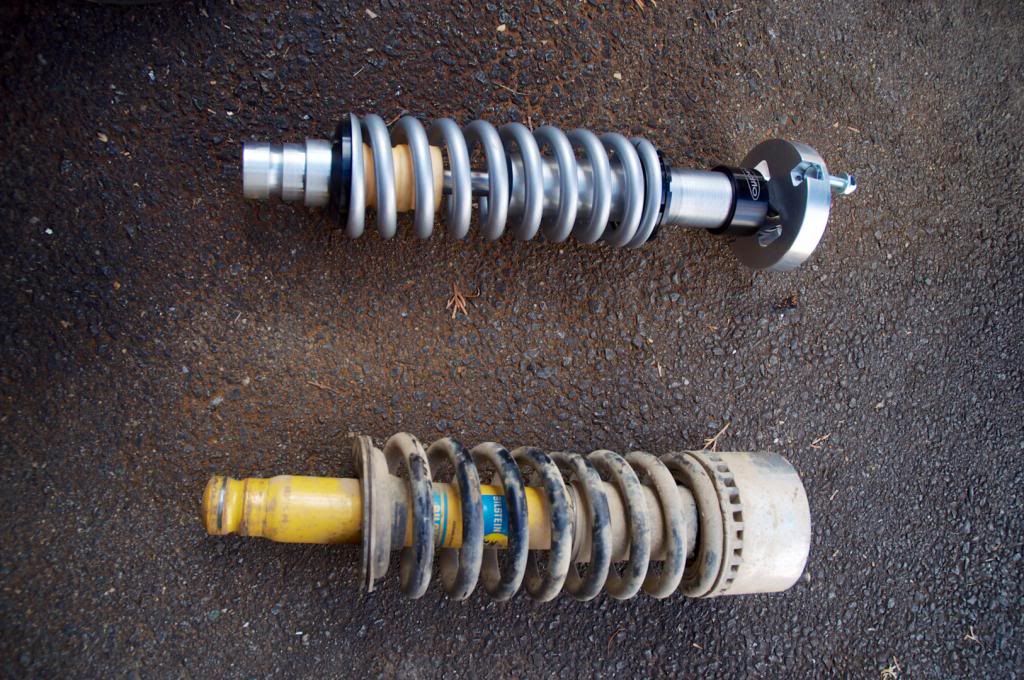
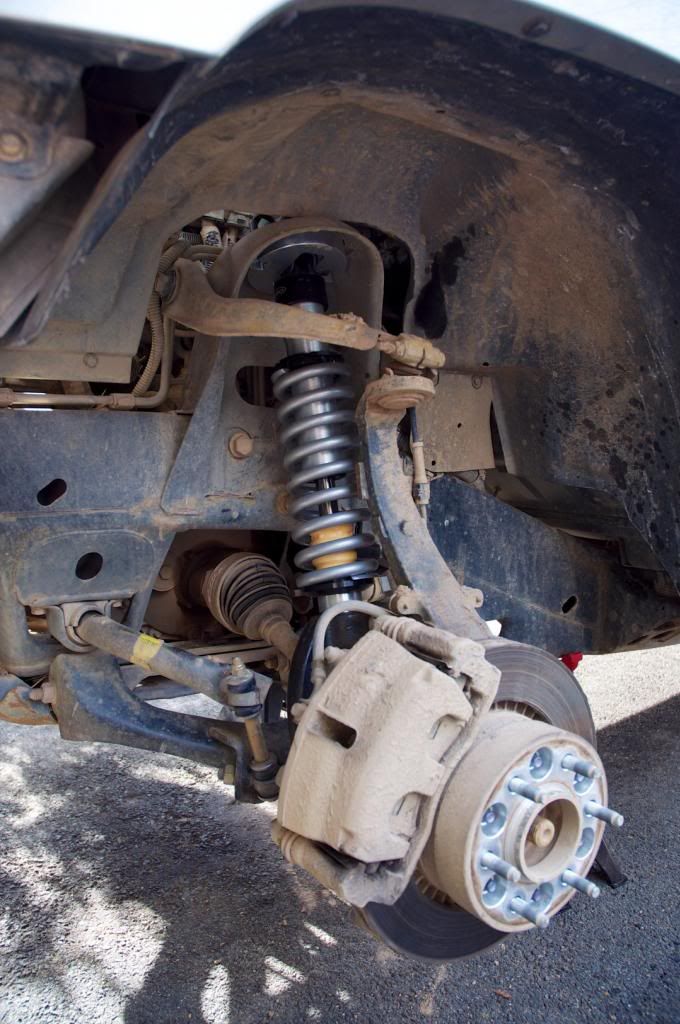
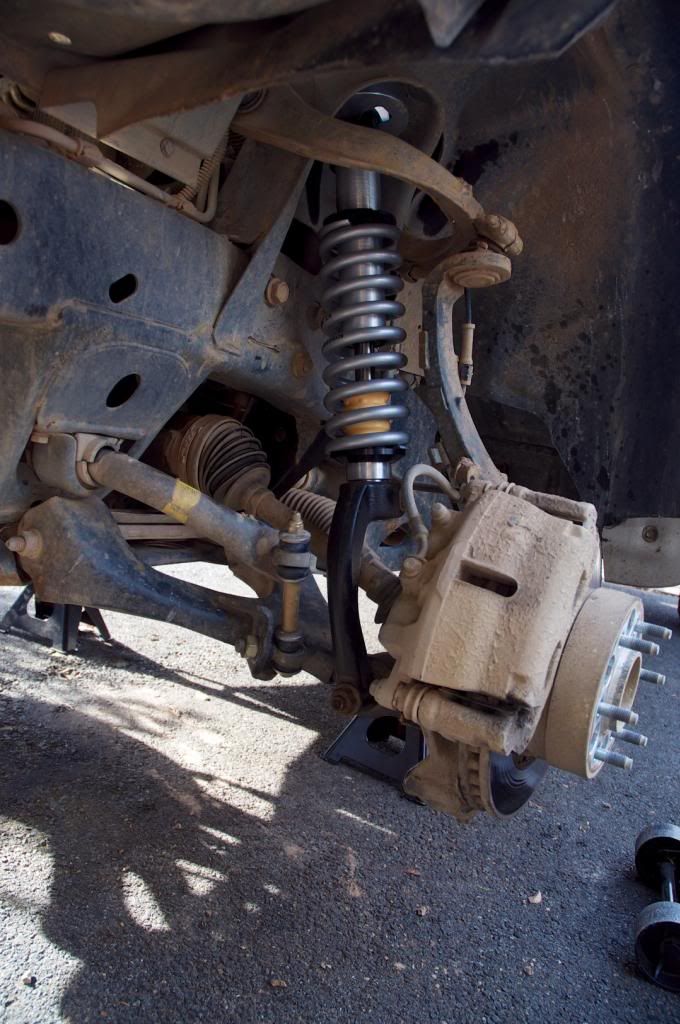
Installed my Radflos today:

Adjustment (viewtopic.php?f=15&t=4833):
Image

Before:
Image

Comparison:
Image

After:
Image
Image
User avatar
firefox2501
Off-Roader
 
Posts: 208
Joined: Sat Mar 09, 2013 7:49 pm
Location: VA, Chantilly
Name: Mike
Vehicle Year: 2006
Vehicle: Chevrolet TrailBlazer
DriveTrain: 4WD
Rank: Offroad Rated

by firefox2501 » Sat Dec 27, 2014 6:07 pm

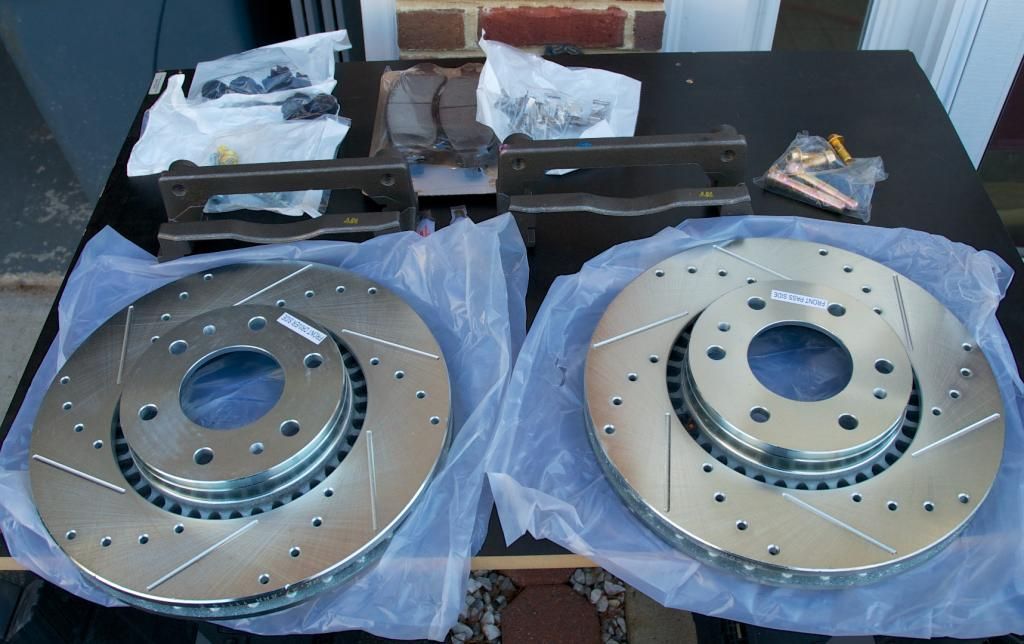
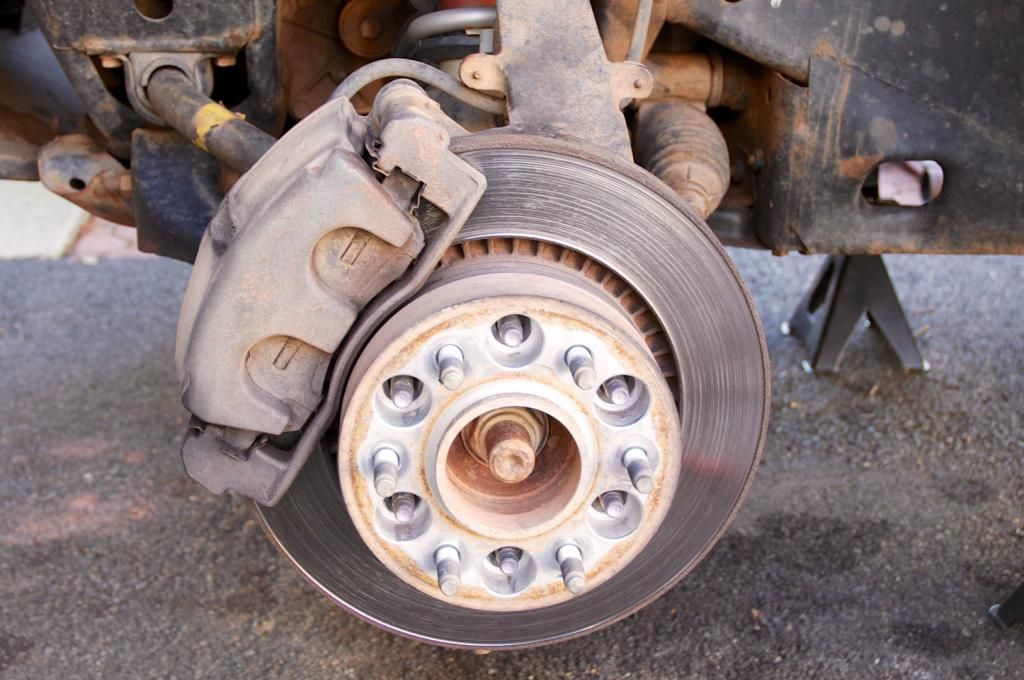
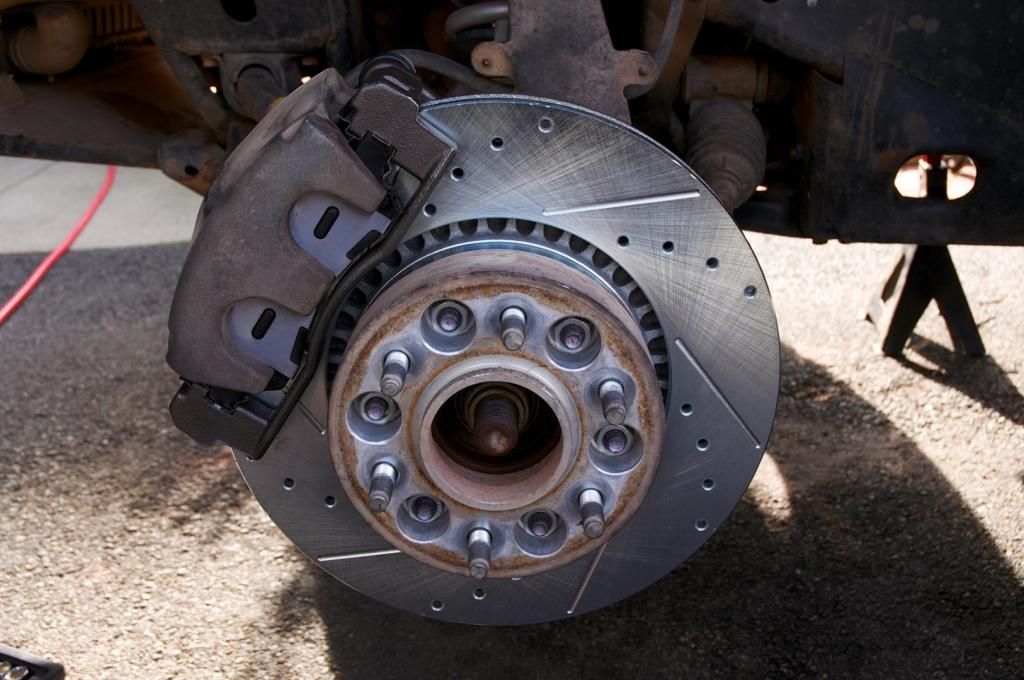
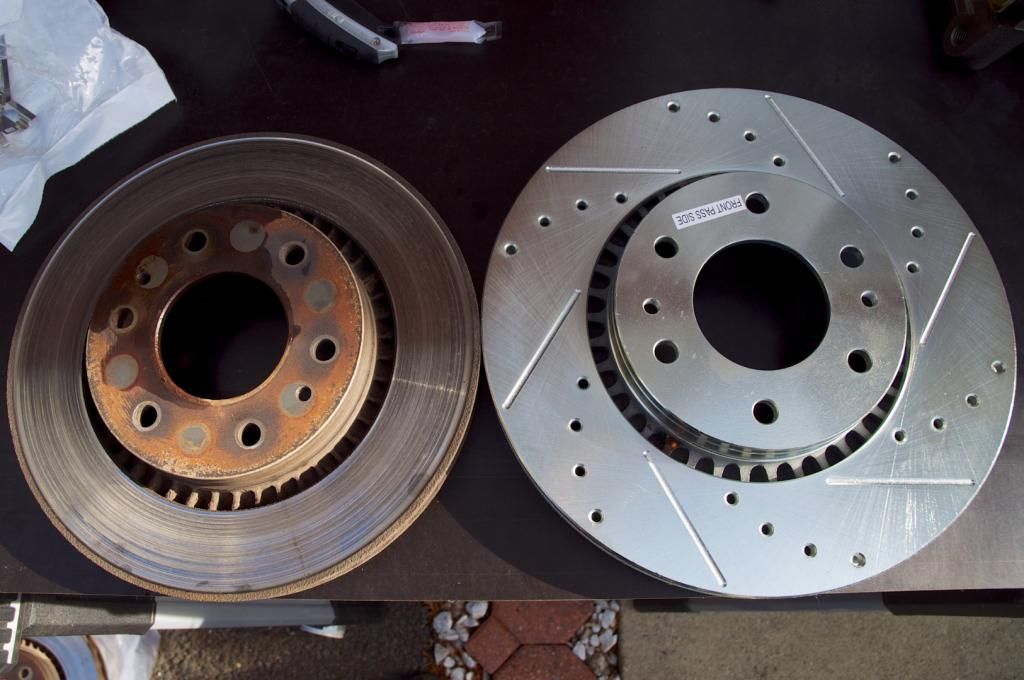
Needed new brakes, so I used it as an opportunity to do the EXT/SS brake upgrade. viewtopic.php?f=27&t=4622

Went with the Powerstop Severe Duty/Towing kit which had drilled and slotted rotors and associated pads.

Parts:
Image

Before:
Image

After:
Image

Side by side comparison:
Image
User avatar
firefox2501
Off-Roader
 
Posts: 208
Joined: Sat Mar 09, 2013 7:49 pm
Location: VA, Chantilly
Name: Mike
Vehicle Year: 2006
Vehicle: Chevrolet TrailBlazer
DriveTrain: 4WD
Rank: Offroad Rated


Return to Offroad Rated Builds

cron