4Crawlin Build Thread
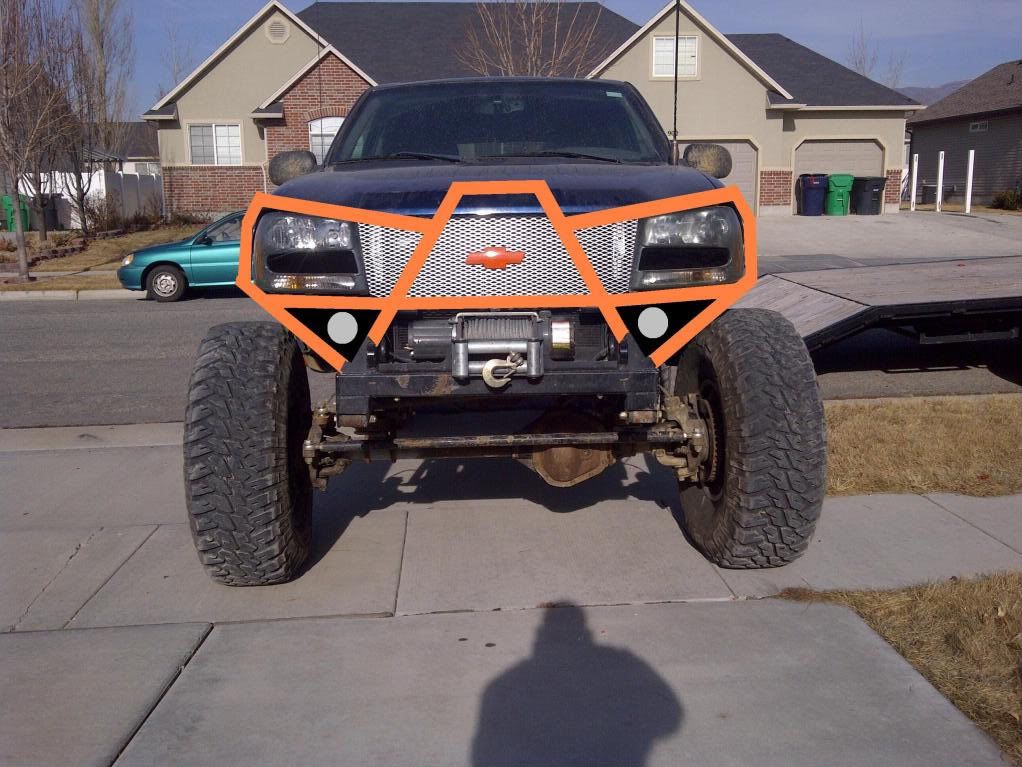
Or with lower filler panels and lights.
-

chevycrew - Veteran
- Posts: 1088
- Joined: Tue Mar 08, 2011 2:42 pm
- Location: UT, Salt Lake City
- Name: Steve
- Vehicle Year: 2002
- Vehicle: Chevrolet TrailBlazer
- DriveTrain: 4WD
- Rank: Trail Ready
IMO paint the headlight centers you made the same as the body color. The black looks off to me for some reason.
I own too many vehicles now. Let's leave it at that.
The old Trailblazer - Build
The old Trailblazer - Build
-

fishsticks - Moderator
- Posts: 4358
- Joined: Thu Apr 01, 2010 11:30 pm
- Location: WA, Castle Rock
- Name: Donny
- Vehicle Year: Other
- Vehicle: Other Vehicle
- DriveTrain: 4WD w/ Aftermarket Locker
- Rank: Extreme Offroader
like the panels and lights. that bumper idea is taking shape nice
-
dirty anton - Trail-Blazer
- Posts: 426
- Joined: Thu Aug 19, 2010 12:21 am
- Location: upper marlboro md
- Name: mike
- Vehicle Year: 2002
- Vehicle: Chevrolet TrailBlazer
- DriveTrain: 4WD w/ Aftermarket Locker
- Rank: Extreme Offroader
chevycrew wrote:Actually I went out and moved it just now between posts...
The stock bowtie fits through the holes in the mesh, but I cant perfectly center it. If you look close in the pic (count the holes) it is off about 1 hole to the passenger side. I moved it up one hole, and to the drivers side a hole. Its still off about 1/4" from being perfect, but I dont want to commit and chop bigger holes in the grille.
All of that because I said it was crooked?
Sometimes working with expanded metal has its pitfalls.
-

djthumper - Moderator
- Posts: 2702
- Joined: Wed Mar 24, 2010 6:04 pm
- Location: NV, Las Vegas
- Name: Larry
- Vehicle Year: 2006
- Vehicle: Chevrolet TrailBlazer
- DriveTrain: 4WD
- Rank: Offroad Rated
Blue:

Silver:

Silver:
-
chevycrew - Veteran
- Posts: 1088
- Joined: Tue Mar 08, 2011 2:42 pm
- Location: UT, Salt Lake City
- Name: Steve
- Vehicle Year: 2002
- Vehicle: Chevrolet TrailBlazer
- DriveTrain: 4WD
- Rank: Trail Ready
djthumper wrote:All of that because I said it was crooked?
Sometimes working with expanded metal has its pitfalls.
Yep pretty much. I installed it before the driver side headlight was in and thought thats where it looked the best. After looking at it again I found I could get it closer... Im picky...
-
chevycrew - Veteran
- Posts: 1088
- Joined: Tue Mar 08, 2011 2:42 pm
- Location: UT, Salt Lake City
- Name: Steve
- Vehicle Year: 2002
- Vehicle: Chevrolet TrailBlazer
- DriveTrain: 4WD
- Rank: Trail Ready
Looks nice i like the blue my opinion.
Dame
BDS,ROUGH COUNTRY,
Smitty Build XR-C8 Winch
33" Procomp M/T X MARK SPACERS.
Only Blue lifted 2002 Trailblazer in WMASS.
www.wm4x4.com
BDS,ROUGH COUNTRY,
Smitty Build XR-C8 Winch
33" Procomp M/T X MARK SPACERS.
Only Blue lifted 2002 Trailblazer in WMASS.
www.wm4x4.com
- DmccartneyFF2TB
- Trail-Blazer
- Posts: 447
- Joined: Mon Aug 30, 2010 7:03 am
- Location: Wilbraham MA
- Name: Damian
- Vehicle Year: 2002
- Vehicle: Chevrolet TrailBlazer
- DriveTrain: 4WD
- Rank: Offroad Rated
Definitely blue...
I own too many vehicles now. Let's leave it at that.
The old Trailblazer - Build
The old Trailblazer - Build
-
fishsticks - Moderator
- Posts: 4358
- Joined: Thu Apr 01, 2010 11:30 pm
- Location: WA, Castle Rock
- Name: Donny
- Vehicle Year: Other
- Vehicle: Other Vehicle
- DriveTrain: 4WD w/ Aftermarket Locker
- Rank: Extreme Offroader
-
djthumper - Moderator
- Posts: 2702
- Joined: Wed Mar 24, 2010 6:04 pm
- Location: NV, Las Vegas
- Name: Larry
- Vehicle Year: 2006
- Vehicle: Chevrolet TrailBlazer
- DriveTrain: 4WD
- Rank: Offroad Rated
Well since they are in for now, black will stay. But when I pull out the drivers headlight to replace it (aftermarket with plastic yellowing) I will repaint them blue to see how it looks.
-
chevycrew - Veteran
- Posts: 1088
- Joined: Tue Mar 08, 2011 2:42 pm
- Location: UT, Salt Lake City
- Name: Steve
- Vehicle Year: 2002
- Vehicle: Chevrolet TrailBlazer
- DriveTrain: 4WD
- Rank: Trail Ready
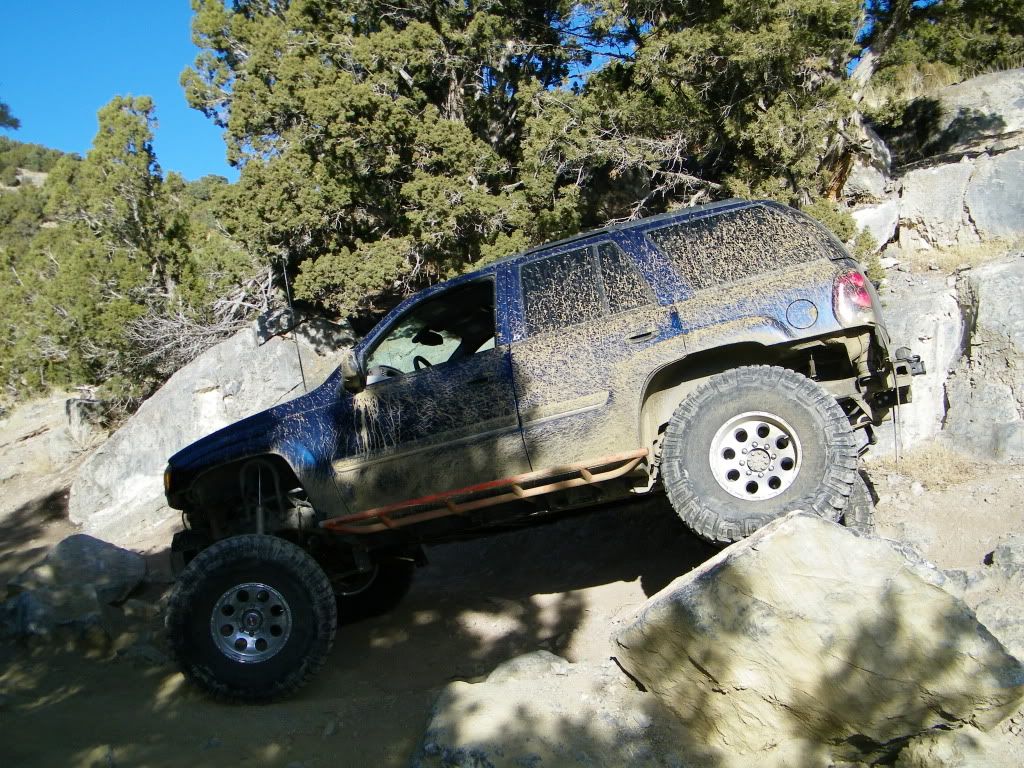
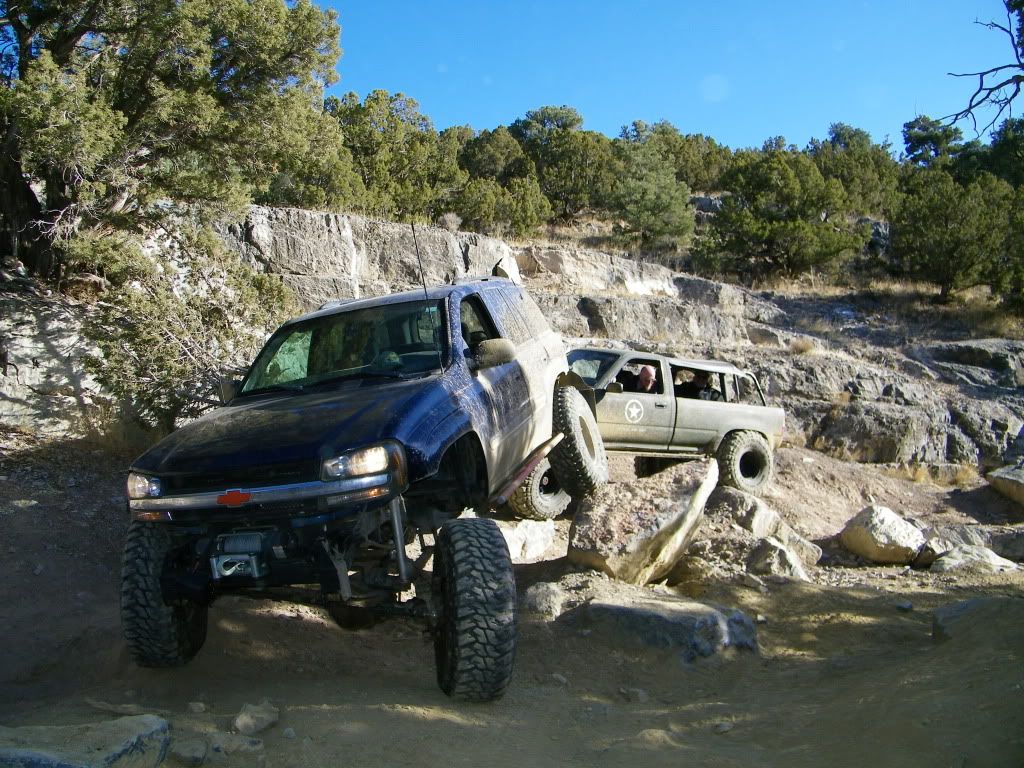
Couple pictures from the last trip out. (Lighting sucks!)
-
chevycrew - Veteran
- Posts: 1088
- Joined: Tue Mar 08, 2011 2:42 pm
- Location: UT, Salt Lake City
- Name: Steve
- Vehicle Year: 2002
- Vehicle: Chevrolet TrailBlazer
- DriveTrain: 4WD
- Rank: Trail Ready
beautiful!! Love your truck dude!! 
Current Count of Transmission Rebuilds: 5.5
***The more you know, the less you need.***
USMC '07-'12
Dirty Bacon's Build
-

DirtyBacon04 - Moderator
- Posts: 3049
- Joined: Fri Aug 05, 2011 4:59 am
- Location: AK, Fairbanks
- Name: Michael
- Vehicle Year: 2004
- Vehicle: Chevrolet TrailBlazer
- DriveTrain: 4WD w/ Aftermarket Locker
- Rank: Expedition Rated
Fixed my Ambient Air Temperature Sensor, (rear view mirror) It was just that the sensor was missing. Plugged in new sensor, zip tied to hood release cable, and problem is fixed for $10.
-
chevycrew - Veteran
- Posts: 1088
- Joined: Tue Mar 08, 2011 2:42 pm
- Location: UT, Salt Lake City
- Name: Steve
- Vehicle Year: 2002
- Vehicle: Chevrolet TrailBlazer
- DriveTrain: 4WD
- Rank: Trail Ready
Here are my thoughts for the day...
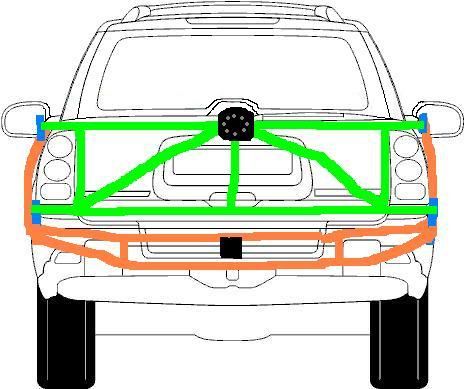
6 point internal cage. Down legs in the front floor, behind front seats, then behind rear seats. The cage will be sandwich plated to the floor, and tied into the sliders below with an X brace behind the front seats. The spare with either be angled in the rear cargo area sitting on the floor and a cross bar, or mounted outside on the rear. Either way, I cant see out the back window. This can be remedied with a backup camera (or two).
The rear corner guards/fender hoops will end up tieing into the interior cage through the body, just below the rear window, behind the rear door. This will prevent the rear quarters from getting pushed in and a crossbar behind the rear gate will further strenthen this area.
An exo cage adds a bunch more tube, weight, and loss of aerodynamics. I will still add bumpers and fender hoops front and rear. With the design of the tb body, you cant protect the doors and have them still function, and the long spans of tube over the roof would most likely bend down crushing the body anyway.
Rear idea:
-
chevycrew - Veteran
- Posts: 1088
- Joined: Tue Mar 08, 2011 2:42 pm
- Location: UT, Salt Lake City
- Name: Steve
- Vehicle Year: 2002
- Vehicle: Chevrolet TrailBlazer
- DriveTrain: 4WD
- Rank: Trail Ready
I love your tb dude nice work and that rear cage/bumper/tire rack will look real good and one of those bumpers that hardtrailz or roadie has would look real good on the front.
-

drwfaulk - Off-Roader
- Posts: 115
- Joined: Mon Jan 09, 2012 3:43 pm
- Location: MS, Southaven
- Name: andrew
- Vehicle Year: 2005
- Vehicle: Chevrolet TrailBlazer
- DriveTrain: 4WD
So I had issues with my winch last time out, water and mud inside the solenoid box was the culprit. So I did some research and decided on a upgrade and solution to the problem.
Wiring specific to my style of winch (2 leads on motor, polarity reverses to change direction):
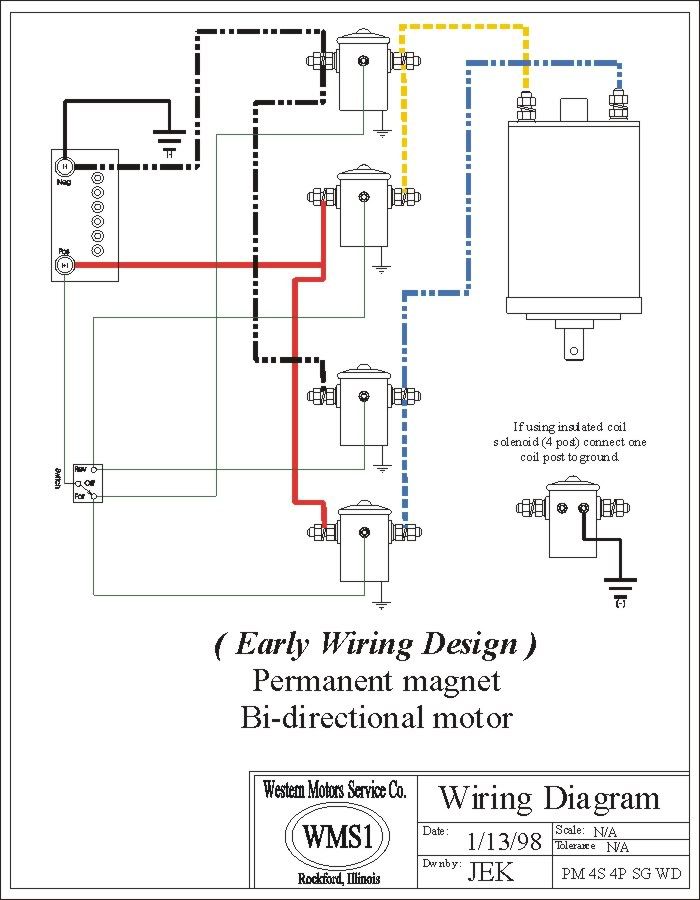
Under hood wiring with 4 - 150 amp continuous duty (300 amp max) solenoids:

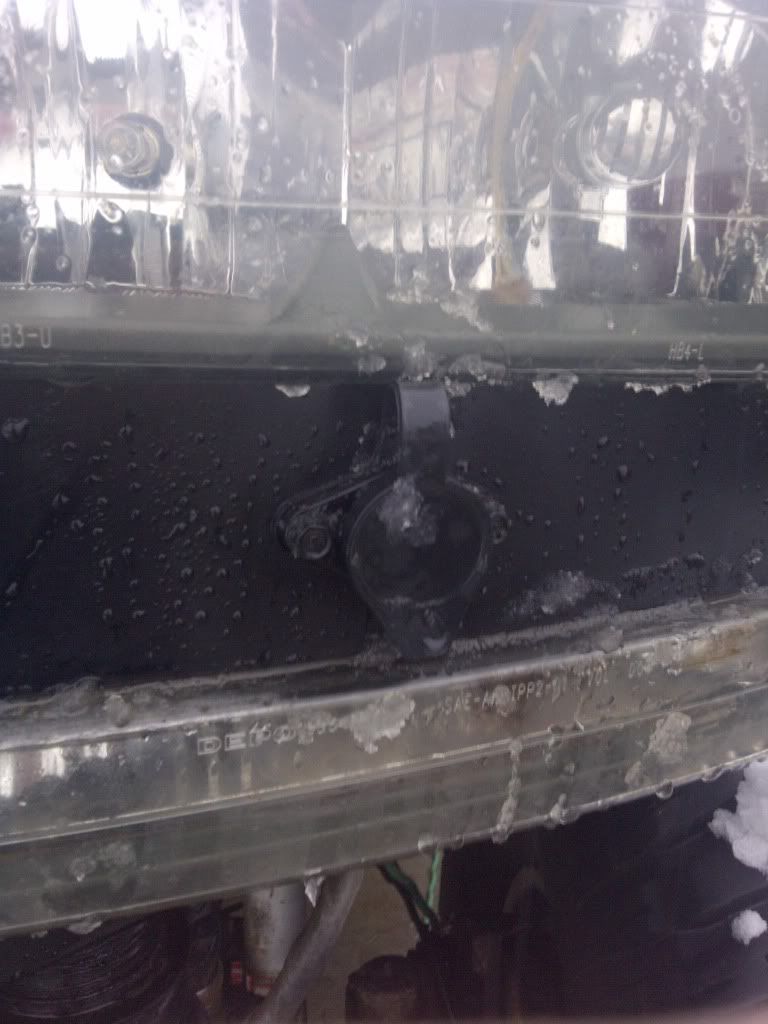
Winch controller plug in mounted in driver side headlight filler panel:
Wiring specific to my style of winch (2 leads on motor, polarity reverses to change direction):
Under hood wiring with 4 - 150 amp continuous duty (300 amp max) solenoids:
Winch controller plug in mounted in driver side headlight filler panel:
-
chevycrew - Veteran
- Posts: 1088
- Joined: Tue Mar 08, 2011 2:42 pm
- Location: UT, Salt Lake City
- Name: Steve
- Vehicle Year: 2002
- Vehicle: Chevrolet TrailBlazer
- DriveTrain: 4WD
- Rank: Trail Ready
You get the solenoids from 12voltguy?
I own too many vehicles now. Let's leave it at that.
The old Trailblazer - Build
The old Trailblazer - Build
-
fishsticks - Moderator
- Posts: 4358
- Joined: Thu Apr 01, 2010 11:30 pm
- Location: WA, Castle Rock
- Name: Donny
- Vehicle Year: Other
- Vehicle: Other Vehicle
- DriveTrain: 4WD w/ Aftermarket Locker
- Rank: Extreme Offroader
No I ordered them off ebay, they should be fine, but Im not impressed with the undersized studs (nuts will tighten up but fit kinda loose.)
-
chevycrew - Veteran
- Posts: 1088
- Joined: Tue Mar 08, 2011 2:42 pm
- Location: UT, Salt Lake City
- Name: Steve
- Vehicle Year: 2002
- Vehicle: Chevrolet TrailBlazer
- DriveTrain: 4WD
- Rank: Trail Ready
chevycrew wrote:No I ordered them off ebay, they should be fine, but Im not impressed with the undersized studs (nuts will tighten up but fit kinda loose.)
Link? My solenoid box is flaky on my HF winch too.
I own too many vehicles now. Let's leave it at that.
The old Trailblazer - Build
The old Trailblazer - Build
-
fishsticks - Moderator
- Posts: 4358
- Joined: Thu Apr 01, 2010 11:30 pm
- Location: WA, Castle Rock
- Name: Donny
- Vehicle Year: Other
- Vehicle: Other Vehicle
- DriveTrain: 4WD w/ Aftermarket Locker
- Rank: Extreme Offroader
http://www.ebay.com/itm/4-Industrial-So ... 414ea27bb7
These are the ones I ordered, I switched the nuts from the included to 5/16 fine thread crimp style lock nuts and they still threaded on by hand. They are china built as well.
These are the ones I ordered, I switched the nuts from the included to 5/16 fine thread crimp style lock nuts and they still threaded on by hand. They are china built as well.
-
chevycrew - Veteran
- Posts: 1088
- Joined: Tue Mar 08, 2011 2:42 pm
- Location: UT, Salt Lake City
- Name: Steve
- Vehicle Year: 2002
- Vehicle: Chevrolet TrailBlazer
- DriveTrain: 4WD
- Rank: Trail Ready